<?xml version="1.0" encoding="utf-8"?>
<?xml-stylesheet type="text/xsl" href="aqualung-xhtml-view.xsl"?>

<!DOCTYPE aqualung-doc SYSTEM "http://aqualung.factorial.hu/manual/aqualung-doc.dtd">

<aqualung-doc>

  <titlepage>

    <title>Aqualung User's Manual</title>

    <copyright>2006-2010 Peter Szilagyi</copyright>

    <license>Permission is granted to copy, distribute and/or modify this document<br/>
    under the terms of the GNU Free Documentation License, Version 1.2<br/>
    or any later version published by the Free Software Foundation.</license>

  </titlepage>

  <document>

    <section title="Introduction" man="DESCRIPTION">

      <p>Aqualung is an advanced music player originally targeted at
      the GNU/Linux operating system, today also running on FreeBSD,
      OpenBSD and Microsoft Windows. It plays audio CDs, internet
      radio streams and podcasts as well as soundfiles in just about
      any audio format and has the feature of inserting <emph>no
      gaps</emph> between adjacent tracks. It also supports high
      quality sample rate conversion between the file and the output
      device, when necessary.</p>

      <p>Audio CDs can be played back and ripped with on-the-fly
      conversion to WAV, FLAC, Ogg Vorbis or CBR/VBR MP3 (gapless via
      LAME). Seamless tagging of the created files is offered as part
      of the process. Internet radio stations streaming Ogg Vorbis or
      MP3 are supported. Subscribing to RSS and Atom audio podcasts is
      supported: Aqualung can automatically download and add new files
      to the Music Store. Optional limits for the age, size and number
      of downloaded files can be set.</p>

      <p>Almost all sample-based, uncompressed formats (e.g. WAV,
      AIFF, AU etc.), as well as files encoded with FLAC (the Free
      Lossless Audio Codec), Ogg Vorbis, Ogg Speex, MPEG Audio
      (including the infamous MP3 format), MOD audio formats (MOD,
      S3M, XM, IT, etc.), Musepack and Monkey's Audio Codec are
      supported. Numerous formats and codecs are also supported via
      the FFmpeg project, including AC3, AAC, WMA, WavPack and the
      soundtrack of many video formats. There is also a native
      (non-FFmpeg) WavPack decoder. The program can play the music
      through OSS, ALSA, sndio, PulseAudio, the JACK Audio Connection
      Kit, or even using the Win32 Sound API (available only under
      Cygwin or native Win32). Depending on the compile-time options,
      not all file formats and output drivers may be usable in a
      particular build. Type <cmd>aqualung -v</cmd> to get a list of
      all the compiled-in features.</p>

      <p>Aqualung supports the LADSPA 1.1 plugin standard. You can use
      any suitable plugin to enhance the music you are listening
      to.</p>

      <p>Other features of the program are: tabbed playlist,
      internally working volume and balance controls (not touching the
      soundcard mixer), multiple skin support, random seeking during
      playback, track repeat, list repeat and shuffle mode (besides
      normal playback). In track repeat mode the looping range is
      adjustable. Aqualung will come up in the same state as it was
      when you closed it, including playback modes, volume and balance
      settings, currently processing LADSPA plugins, window sizes,
      positions and visibility, and other miscellaneous
      options. Aqualung has the ability to display and edit Ogg Xiph
      comments, ID3v1, ID3v2 and APE tags, as well as FLAC picture
      frames found in files that support them. See the section about
      <ref refkey="meta-support">metadata support</ref> for full reference.</p>

      <p>The method of assembling the title string of a track is programmable
      (via a user-provided Lua function) and can include nearly any metadata
      item or audio file attribute. See the documentation of the
      <ref refkey="settings-general"><gui>Lua extension file</gui>
      config setting</ref> for full reference.</p>

      <p>You can control any running instance of the program remotely
      from the command line (start, stop, pause etc.). Remote loading
      or enqueueing soundfiles as well as complete playlists is also
      supported.</p>

      <p>In addition to all this, Aqualung provides a so-called Music
      Store that is an XML-based music database, capable of storing
      various metadata about music on your computer (including, but
      not limited to, the names of artists, and the titles of records
      and tracks). You can (and should) organize your music into trees
      of Artists/Records/Tracks, thereby making life easier than with
      the all-in-one Winamp/XMMS playlist. Importing file metadata
      (ID3v1, ID3v2 tags, Ogg Xiph comments, APE metadata) into the
      Music Store as well as getting track names from a CDDB/FreeDB
      database is supported. For audio CDs, CD-Text retrieval is also
      implemented.</p>

    </section>

    <section title="Quick Start Guide">

      <p>If you'd like to get your hands on the program quickly rather
      than to spend your evening reading the rest of the manual, here
      is the absolute minimum you need to know to successfully use the
      program. So make sure to read this (deliberately short) chapter,
      and come back for the rest when you have questions while using
      the program. Ultimately, you may ask questions on the
      <a href="https://lists.sourceforge.net/lists/listinfo/aqualung-friends">
      aqualung-friends</a> mailing list.</p>

      <subsection title="Getting Aqualung">

        <p>It is not hard to get Aqualung up and running on your
        machine, although for beginners the number of compile-time
        options might be intimidating at first. The steps you need to
        take depend on the platform and operating system you use. For
        detailed information please look at the <a
        href="http://aqualung.factorial.hu/compiling.html">relevant
        page</a> of the Aqualung website.</p>

        <p>In case you are not used to compiling software yourself,
        you may check whether there is a distribution-provided package
        of Aqualung. Installing such a package is generally the
        easiest and fastest way to get Aqualung, however this way you
        won't be able to try the latest features. Currently there are
        Aqualung packages for major Linux distributions such as <a
        href="http://packages.debian.org/aqualung">Debian</a>, Gentoo,
        SuSE, etc. as well as <a
        href="http://www.freshports.org/audio/aqualung">
        FreeBSD</a>. If your distribution lacks such a package,
        consider contacting the organization maintaining the
        distribution and ask them to provide a package of
        Aqualung. Anyway, you might have to compile Aqualung from
        source. This is not very hard, either <ndash/> the
        <cmd>configure</cmd> script tries to adapt Aqualung to your
        system as much as possible without breaking the program. See
        the above website for more information.</p>

        <p>On Microsoft Windows, all you have to do is download and
        run the self-extracting installer utility, which guides you
        through a few easy to follow steps and installs the program on
        your machine. Make sure to visit <a
        href="http://aqualung.factorial.hu/win32">this page</a> for
        more information about the Windows version of Aqualung.</p>

      </subsection>

      <subsection title="Starting the program for the first time">

        <p>Aqualung has a large number of configuration settings,
        which are adjustable through the user interface at run-time
        (no need to edit config files by hand), and are remembered
        across multiple invocations of the program. When Aqualung
        starts for the first time, it creates a configuration based on
        some wired-in defaults. A good way of exploring the program's
        capabilities is poking through the configuration area. You can
        access this by clicking in the main window with the right
        mouse button, which will pop up the program's main
        menu. Choosing <gui>Settings</gui> from the menu will open the
        configuration dialog.</p>

        <p>In fact, clicking with the right mouse button almost
        anywhere is a generally smart idea. Aqualung has lots of
        context-sensitive popup menus in the Music Store, the Playlist
        (often embedded in the main window) and elsewhere. It's good
        to keep this in mind when taking the explorative approach
        instead of reading the whole manual right away.</p>

        <p>Let's add some music to the Playlist and start playback
        right away. Right-click the <gui>Add files</gui> button, and
        choose <gui>Add directory</gui> from the menu. (The
        right-clicking trick works for the other two buttons as
        well. Left-clicking is a shortcut to immediately execute the
        action denoted by the button's caption.) Choose a directory
        with some music under it. It's OK to have subdirectories under
        this directory, the program will search for playable files
        recursively. After the Playlist starts to get populated with
        tracks, press play, or double-click on one of the tracks to
        play. Press <q>i</q> to see metadata information about the
        selected track.</p>

      </subsection>

      <subsection title="Setting up a Music Store">

        <p>Now that you have some music playing, let's get more
        organized. In the Music Store window click in the empty area
        with the right mouse button and choose <gui>Create empty
        store...</gui> from the menu. Enter a meaningful name such as
        <q>Tom's Music</q> and choose a location to save the XML file
        of the store to. This should be a writable location, so it is
        wise to stick to a location inside your home directory. (A
        system-wide path or a remote NFS mount with read-only access
        won't do.)</p>

        <p>You can have any number of such stores in the Music Store
        organizer, and it is indeed a great idea to have separate
        stores for music differentiated by origin, genre, or some
        other aspect. One great use is multiple stores with the actual
        music files stored on multiple remote machines, one store for
        each machine. Or just a store for your local music and another
        for files on your bedroom file server box. There are several
        possibilities.</p>

        <p>But how do you populate the store with music you already
        have on your drive? It's easy if your music is stored in an
        organized manner on the filesystem level. As a minimum, this
        means that tracks intended to go into one store are found
        under a common root directory in the filesystem (there may be
        several directory layers down from the root to the individual
        files, but there must be a common ancestor). In this case the
        so-called Music Store Builder will take care of things for
        you. Right-click on your newly-created empty store and choose
        <gui>Build / Update store from filesystem</gui>. Choose
        Independent mode and in the dialog you get, enter the root
        directory under which your collection resides. As you can
        probably guess at this point, the store builder interface is
        pretty flexible, however the default settings should be good
        to get something together quickly without further hassle.</p>

        <p>Pressing <gui>OK</gui> will start the process, during which
        the directory structure below the root you specified will be
        traversed. The artist/record/track names are determined from
        potentially multiple data sources (CDDB, metadata e.g. ID3v2
        tags or Ogg Xiph comments, and filesystem names). The logic
        involved is fairly elaborate. You are strongly advised to <ref
        refkey="builder">read</ref> the detailed usage instructions
        for the Music Store Builder.</p>

      </subsection>

      <subsection title="Playing and ripping an Audio CD">

        <p>You can play CDs with Aqualung easily. Just put the CD in
        one of your CD drives, and if everything goes well, Aqualung
        will detect it, do a CDDB lookup to retrieve artist, record
        and track info (CD-Text is also used if the CD has it), and
        make it available to you through the special Music Store node
        called <q>CD Audio</q>.</p>

        <p>You don't have to be happy with what you have so far. The
        Music Store paradigm is fairly addictive, as it's much easier
        to drop something into the Playlist from the Music Store than
        physically placing a CD in the drive. So as you keep expanding
        your CD collection, you will probably want to have those
        records in one of your music stores, too. In this case all you
        have to do is choose <gui>Rip CD...</gui> from the disc's
        popup menu, and supply some information. We won't go into
        details here (please refer to <ref refkey="cd">this
        section</ref> in case the interface is not obvious). However,
        it is worth stating that you should have a separate directory
        for the files of each record. Ripping multiple CDs into the
        same directory won't work.</p>

      </subsection>

    </section>

    <section title="Command Line Interface">

      <subsection title="Invocation">

        <dl man="SYNOPSYS">

          <dt>
            <cmd>aqualung --help</cmd>
          </dt>

          <dd man="no">Print help message with valid parameters and
          example invocations.</dd>

          <dt>
            <cmd>aqualung --version</cmd>
          </dt>

          <dd man="no">Print version information and list of
          compiled-in features.</dd>

          <dt>
            <cmd>aqualung [--output (jack|pulse|alsa|oss|sndio|win32)] [options] [file1 [file2 ...]]</cmd>
          </dt>

        </dl>

        <p man="OPTIONS">Normally you should be able to start Aqualung
        without any options. This case the output device will be
        selected by probing for a usable driver (in order of JACK,
        PulseAudio, ALSA, OSS) with default parameters.</p>

        <p man="OPTIONS">If no driver could be started with default
        parameters, or you want to explicitly choose a suitable output
        configuration, you have to tell the program which output
        device to use. This is possible with the <cmd>-o</cmd>
        (<cmd>--output</cmd>) option. There are specific optional
        parameters for all five output drivers. You can also specify
        which sample rate converter you want to use, or request a list
        of available converters. You may also control another instance
        of the program remotely, or add files to the Playlist.</p>

      </subsection>

      <subsection title="General options" man="OPTIONS">

        <dl>

          <dt>
            <cmd>-D, --disk-realtime</cmd>
          </dt>

          <dd>Try to use realtime (<cmd>SCHED_FIFO</cmd>) scheduling
          for disk thread, a background worker thread doing file
          decoding and sample rate conversion. Try this (and
          optionally <cmd>-Y</cmd>) if you experience short audio
          dropouts caused by other programs (e.g. web browser loading
          a complex page).</dd>

          <dt>
            <cmd>-Y, --disk-priority &lt;int&gt;</cmd>
          </dt>

          <dd>When running <cmd>-D</cmd>, set scheduler priority to
          &lt;int&gt; (defaults to 1).</dd>

        </dl>

      </subsection>

      <subsection title="Output specific options">

        <subsubsection title="Options relevant to ALSA output" man="OPTIONS">

          <dl>

            <dt>
              <cmd>-d, --device &lt;name&gt;</cmd>
            </dt>

            <dd>Set the output device (defaults to 'default').</dd>

            <dt>
              <cmd>-r, --rate &lt;int&gt;</cmd>
            </dt>

            <dd>Set the output sample rate.</dd>

            <dt>
              <cmd>-b, --buffer-size &lt;int&gt;</cmd>
            </dt>

            <dd>Set the ALSA output buffer size (in frames).</dd>

            <dt>
              <cmd>-R, --realtime</cmd>
            </dt>

            <dd>Try to use realtime (<cmd>SCHED_FIFO</cmd>) scheduling
            for ALSA output thread.</dd>

            <dt>
              <cmd>-P, --priority &lt;int&gt;</cmd>
            </dt>

            <dd>When running <cmd>--realtime</cmd>, set scheduler
            priority to &lt;int&gt; (default is 1 when -R is used).</dd>

          </dl>

        </subsubsection>

        <subsubsection title="Options relevant to OSS output" man="OPTIONS">

          <dl>

            <dt>
              <cmd>-d, --device &lt;name&gt;</cmd>
            </dt>

            <dd>Set the output device (defaults to
            <file>/dev/audio</file> on OpenBSD, <file>/dev/dsp</file>
            on other Unices).</dd>

            <dt>
              <cmd>-r, --rate &lt;int&gt;</cmd>
            </dt>

            <dd>Set the output sample rate.</dd>

            <dt>
              <cmd>-R, --realtime</cmd>
            </dt>

            <dd>Try to use realtime (<cmd>SCHED_FIFO</cmd>) scheduling
            for OSS output thread.</dd>

            <dt>
              <cmd>-P, --priority &lt;int&gt;</cmd>
            </dt>

            <dd>When running <cmd>--realtime</cmd>, set scheduler
            priority to &lt;int&gt; (default is 1 when -R is used).</dd>

          </dl>

        </subsubsection>

        <subsubsection title="Options relevant to JACK output" man="OPTIONS">

          <dl>

            <dt>
              <cmd>-a[&lt;port_L&gt;,&lt;port_R&gt;],
              --auto[=&lt;port_L&gt;,&lt;port_R&gt;]</cmd>
            </dt>

            <dd>Auto-connect output ports to given JACK ports
            (defaults to first two hardware playback ports).</dd>

            <dt>
              <cmd>-c, --client &lt;name&gt;</cmd>
            </dt>

            <dd>Set client name (needed if you want to run multiple
            instances of the program).</dd>

          </dl>

          <p>Note that in the case when JACK output has been selected
          as part of the automatic output device detection, the
          <cmd>-a</cmd> option is implicitly applied.</p>

        </subsubsection>

        <subsubsection title="Options relevant to PulseAudio and sndio output" man="OPTIONS">

          <dl>

            <dt>
              <cmd>-r, --rate &lt;int&gt;</cmd>
            </dt>

            <dd>Set the output sample rate.</dd>

            <dt>
              <cmd>-R, --realtime</cmd>
            </dt>

            <dd>Try to use realtime (<cmd>SCHED_FIFO</cmd>) scheduling
            for sndio output thread.</dd>

            <dt>
              <cmd>-P, --priority &lt;int&gt;</cmd>
            </dt>

            <dd>When running <cmd>--realtime</cmd>, set scheduler
            priority to &lt;int&gt; (default is 1 when -R is used).</dd>

          </dl>

        </subsubsection>

        <subsubsection title="Options relevant to Win32 output" man="OPTIONS">

          <dl>

            <dt>
              <cmd>-r, --rate &lt;int&gt;</cmd>
            </dt>

            <dd>Set the output sample rate.</dd>

          </dl>

        </subsubsection>

      </subsection>

      <subsection title="Options relevant to the Sample Rate Converter" man="OPTIONS">

        <dl>

          <dt>
            <cmd>-s[&lt;int&gt;], --srctype[=&lt;int&gt;]</cmd>
          </dt>

          <dd>Choose the SRC type, or print the list of available
          types if no number given. The default is SRC type 4 (Linear
          Interpolator).</dd>

        </dl>

      </subsection>

      <subsection title="Options for remote cue control" man="OPTIONS">

        <p>Note that remote controlling of instances is only possible
        if the instance you want to send a command to is running as
        the same user as you are when you issue the remote command.</p>

        <dl>

          <dt>
            <cmd>-N, --session &lt;int&gt;</cmd>
          </dt>

          <dd>Specify the instance number to send the remote command
          to. Instances are numbered on a per user basis, starting
          with 0. Except for the zero-th instance (started first), the
          instance number is displayed in the title bar of the main
          window (e.g.: <q>Aqualung.3</q>). If you don't use this
          option, the following options will control the zero-th
          instance by default, except for <cmd>-L</cmd> which defaults
          to the present instance (so as to be able to start playback
          immediately from the command line).</dd>

          <dt>
            <cmd>-B, --back</cmd>
          </dt>

          <dd>Jump to previous track.</dd>

          <dt>
            <cmd>-F, --fwd</cmd>
          </dt>

          <dd>Jump to next track.</dd>

          <dt>
            <cmd>-L, --play</cmd>
          </dt>

          <dd>Start playing.</dd>

          <dt>
            <cmd>-U, --pause</cmd>
          </dt>

          <dd>Pause playback, or resume if already paused.</dd>

          <dt>
            <cmd>-T, --stop</cmd>
          </dt>

          <dd>Stop playback.</dd>

          <dt>
            <cmd>-V, --volume [m|M]|[=]&lt;val&gt;</cmd>
          </dt>

          <dd>Adjust the volume. <cmd>m/M</cmd> means
          mute; if <cmd>=</cmd> is present, the remote instance's
          volume control will be set to the value specified,
          otherwise, the volume will be adjusted by the supplied
          (signed) value. The values are in dB units.</dd>

          <dt>
            <cmd>-Q, --quit</cmd>
          </dt>

          <dd>Terminate remote instance.</dd>

        </dl>

      </subsection>


      <subsection title="Options for file loading" man="OPTIONS">

        <p>You may specify filenames on the command line. These may be
        ordinary soundfiles playable by Aqualung, directories, or
        playlist files you saved earlier. The program will decide if a
        file is a playlist, and add its contents accordingly. In
        addition to Aqualung's native (XML) playlist format, the
        program will load M3U and PLS playlists whenever possible.</p>

        <p>If you used the <cmd>--session</cmd> option (see above),
        the files will be sent to the Aqualung instance you
        specified. Otherwise a new instance will start up with the
        files you specified. Note that if you enabled the <gui>Save
        and restore the Playlist on exit/startup</gui> option in the
        <gui>Settings</gui> dialog, the files you specify will be
        loaded <emph>after</emph> the automatically loaded ones.</p>

        <dl>

          <dt>
            <cmd>-E, --enqueue</cmd>
          </dt>

          <dd>Enqueue added files to the Playlist instead of loading
          them (which removes the previous contents of the
          Playlist). Use this if you want to keep the existing items
          in the Playlist.</dd>

          <dt>
            <cmd>-t[&lt;name&gt;], --tab[=&lt;name&gt;]</cmd>
          </dt>

          <dd>Specify target tab for file loading (either remotely
          using the <cmd>--session</cmd> option, or at startup). If
          <cmd>--tab</cmd> is used without the name parameter, the
          files will be added to a new (untitled) tab. If a name is
          supplied, Aqualung will check whether a tab with that name
          already exists. If so, the files will be loaded (or enqueued
          if you used <cmd>-E</cmd>) to that tab. If no such tab
          exists, one with that name will be created, and the content
          goes there.</dd>

        </dl>

        <subsubsection title="Setting up programs to use Aqualung as a soundfile handler" man="no">

          <p>It is possible to set up a host program such as a
          browser, file manager etc. to use Aqualung for opening
          soundfiles. To do this, a command line with the following
          properties should be used:</p>

          <ul>
            <li>if an Aqualung instance is already running, send the file(s) to that instance;</li>
            <li>if no instance is running, start up a new instance;</li>
            <li>either case, start playing the file(s) immediately after loading them.</li>
          </ul>

          <p>One solution to this is to use</p>

          <dl>
            <dd></dd>
            <dt><cmd>aqualung -N0 -E -L -t'File Manager' %s</cmd></dt>
          </dl>

          <p>where <cmd>%s</cmd> is one or more filenames. It should be noted
          that the file associations (the mechanism of knowing which
          files to open via Aqualung) is completely within the scope
          of the host program.</p>

        </subsubsection>

      </subsection>

      <subsection title="Options for changing state of Playlist/Music Store windows" man="OPTIONS">

        <dl>

          <dt>
            <cmd>-l [yes|no], --show-pl=[yes|no]</cmd>
          </dt>

          <dd>Show/hide Playlist window.</dd>

          <dt>
            <cmd>-m [yes|no], --show-ms=[yes|no]</cmd>
          </dt>

          <dd>Show/hide Music Store window.</dd>

        </dl>

      </subsection>

      <subsection title="Examples" man="OPTIONS">

        <dl>

          <dt>
            <cmd>$ aqualung -s3 -o alsa -R -r 48000 -d plughw:0,0</cmd>
          </dt>

          <dt>
            <cmd>$ aqualung --srctype=1 --output oss --rate 96000</cmd>
          </dt>

          <dt>
            <cmd>$ aqualung -o jack --auto=system:playback_17,system:playback_18</cmd>
          </dt>

          <dt>
            <cmd>$ aqualung -o jack -a -E --tab="Led Zeppelin" `find ./ledzeppelin/ -name '*.flac'`</cmd>
          </dt>

        </dl>

      </subsection>


      <subsection title="Environment">

        <p man="ENVIRONMENT">Aqualung obeys two environment variables
        concerning LADSPA plugins.</p>

        <dl man="ENVIRONMENT">

          <dt>
            <cmd>LADSPA_PATH</cmd>
          </dt>

          <dd>Colon-separated list of paths to search for LADSPA
          plugin <file>.so</file> files.</dd>

          <dt>
            <cmd>LADSPA_RDF_PATH</cmd>
          </dt>

          <dd>Colon-separated list of paths to RDF metadata files
          about these plugins.</dd>

        </dl>

        <p man="ENVIRONMENT">When any of these is not specified, the
        program will use sensible defaults and look in the obvious
        places.</p>

      </subsection>

      <subsection title="Files">

        <p man="FILES">Here is a list of files that Aqualung creates, reads and
        relies on.</p>

        <dl man="FILES">

          <dt>
            <file>$XDG_CONFIG_HOME/aqualung/</file>
          </dt>

          <dd>Directory containing user settings. $XDG_CONFIG_HOME is
          the user-specific directory for application configuration
          information according to the XDG Base Directory Specification.
	  It is most likely equivalent to ~/.config, so the following
	  config files (except the last one, which resides in a
	  system-wide location) are usually found under
	  $HOME/.config/aqualung/</dd>

	  <dd>Note: earlier versions of Aqualung kept these per-user
	  configuration files in ~/.aqualung. This legacy setup is
	  recognized and silently migrated to the XDG-conformant
	  layout.</dd>

          <dt>
            <file>config.xml</file>
          </dt>

          <dd>GUI (skin, window size/position, etc.) and other
          settings.</dd>

          <dt>
            <file>plugin.xml</file>
          </dt>

          <dd>List of running plugins and all their settings.</dd>

          <dt>
            <file>playlist.xml</file>
          </dt>

          <dd>Automatically saved and restored playlist (if you enable
          this feature).</dd>

          <dt>
            <file>&lt;skin-name&gt;</file>
          </dt>

          <dd>Locally available skin &lt;skin-name&gt; (useful for
          skin development).</dd>

          <dt>
            <file>${prefix}/share/aqualung/skin</file>
          </dt>

          <dd>System-wide skin directory.</dd>

        </dl>

      </subsection>

    </section>

    <section title="Graphical Interface">

      <subsection title="Main Window" img="main.png">

        <p>You can control most of the program from this window. The
        cue controls in the bottom-left corner are fairly obvious. You
        can drag the large slider in the middle for seeking. There are
        two smaller sliders above that, the left one is for adjusting
        the volume and the right one for adjusting the balance. Above
        these, there are two horizontal text areas showing information
        about the currently playing track, and input/output parameters
        such as sample rate, mono/stereo, bitrate, output driver
        (e.g. OSS, ALSA, JACK) etc. The first trick to learn is that
        these lines are horizontally draggable with the mouse if the
        text does not fit in the available visible space. However,
        they don't scroll automatically, and for a very good reason.</p>

        <p>In the upper left corner, you find one bigger and two
        smaller displays that show track times: elapsed time,
        remaining time and total track time. The big display also
        shows the current volume and balance setting when
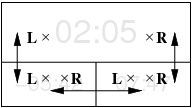
        appropriate. By clicking in these displays, you can rearrange
        the displays as you want them. The following figure shows how
        the displays switch their contents after clicking into them
        with the left (L) or right (R) mouse button.</p>

        <img src="timer.png" alt="time displays reacting to mouse clicks"/>

        <p>In the bottom right corner there are additional
        buttons. The buttons with the letters display or hide
        additional windows of the program:</p>

        <table>
          <tr>
            <td>FX</td>
            <td>Ladspa Patch Builder</td>
          </tr>
          <tr>
            <td>MS</td>
            <td>Music Store</td>
          </tr>
          <tr>
            <td>PL</td>
            <td>Playlist</td>
          </tr>
        </table>

        <p>Note that depending on the skin, these buttons may come
        with images instead of the letters above. However, their
        functionality does not change.</p>

        <p>The remaining three buttons are to select the playback
        mode. When none of these buttons is depressed, playback goes
        the normal way. The buttons are mutually exclusive, and select
        track repeat, list repeat or shuffle mode. I'm sure you can
        figure out which is which. If you select track repeat, a loop
        bar appears above the seek bar, with two markers. The markers
        can be dragged to select the looping range. When they are at
        the left and right end positions, the whole song is repeated.
        The looping range can also be selected using keyboard
        shortcuts. When track repeat is enabled and the current song
        is playing (or paused), <q>&lt;</q> will set the start of the
        looping range to the current playing position; <q>&gt;</q> does
        the same for the end of the looping range.</p>

        <p>Volume and balance slider tricks:</p>

        <ul>
          <li>Shift + any mouse button sets the volume and balance
          sliders back to 0 dB and Center position, respectively. This
          combination also works for the loop bar, in which case the
          looping range is set to the whole song.</li>

          <li>Clicking and holding the right mouse button on these
          sliders shows their position in the big time display without
          altering the value.</li>
        </ul>

        <p>An additional thing to know about the volume control is
        that it ranges up to +6 dB. This means you can send a bigger
        signal to the audio device than in the original file. With 0
        dB corresponding to 100% signal level, +6 dB is almost exactly
        200% signal level (and 4 times signal power as well). This
        means you can overdrive your output device, and since clipping
        will occur at 100% anyway, it will cause nasty digital
        distortion much worse than simple analog overdrive. If you
        have a track with a reasonably low level, you can go above 0
        dB with the volume control. But today most CDs are mastered to
        keep the average volume level very close to the 0 dB (or 100%)
        top, and so they will likely distort with as little as +1 dB
        additional gain. The moral is: if you want it loud, turn up
        your external amp. You can also consider using RVA if the
        volume level of your tracks tends to vary in a wide range
        <ndash/> see <ref refkey="rva">this section</ref> for
        details.</p>

        <p>On a related note, another thing to watch out for is LADSPA
        plugins (in case you use them). It is very common that the
        signal level leaving a plugin is greater than the signal level
        the plugin gets on its input. So it is best to leave a few dB
        of headroom if you do that. A very typical case is boosting
        some frequency bands a few dB with an EQ plugin. You should
        decrease the overall volume level with as much dB as the
        largest boost (or even more), or you are risking that the
        signal will get chopped causing bad distortion. Alternatively,
        apply <a
        href="http://tap-plugins.sourceforge.net/ladspa/limiter.html">this
        limiter plugin</a> as the last one in the processing chain,
        but only if you know what you are doing.</p>

        <p>Right-clicking almost anywhere in the window will bring up
        a menu that allows access to the <gui>Settings</gui> dialog,
        the <gui>Skin Chooser</gui>, the <gui>JACK Port Setup</gui>
        dialog (present only when running the program with JACK
        output), and the <gui>About</gui> box. The latter may be
        useful to see which features have been compiled into the
        program. (If you haven't read the <a
        href="http://aqualung.factorial.hu/compiling.html">page about
        compiling</a> yet: the configuration of the program can be
        adapted so as not to require certain libraries when compiling,
        and not provide certain features accordingly.)</p>

      </subsection>


      <subsection title="Playlist" img="playlist.png">

        <p>The Playlist normally receives its contents from the Music
        Store. However, you can put any file in the Playlist
        regardless of the contents of your Music Store, using the
        <gui>Add files</gui> button at the bottom of the
        window. Adding a directory or a URL are also supported, by
        right-clicking on the button and selecting the appropriate
        menu item, <gui>Add directory</gui> or <gui>Add URL</gui>.</p>

        <p>The <gui>Add URL</gui> menu item can be used to listen to
        Internet radio stations streaming Ogg Vorbis or MP3. You will
        be shown a dialog with an entry, in which you should enter the
        URL of the stream. Pressing <gui>OK</gui> will add it to the
        Playlist. After you start playing the stream, the Playlist
        entry changes to the name of the radio station, with the
        description provided by the station in brackets.</p>

        <p>The other two buttons (<gui>Select all</gui>, <gui>Remove
        selected</gui>) function as you would expect them when clicked
        with the left mouse button. Clicking with the right mouse
        button brings up popup menus that contain further options as
        seen with the <gui>Add files</gui> button.</p>

        <p>There is a statusbar under the list showing the total time
        of the Playlist and the duration of the selected tracks, as
        well as the size of the songs (if enabled).</p>

        <p>The Playlist can not only maintain a linear list of songs,
        but is also capable of keeping the tracks of albums
        together. This is done when a Store, Artist or Record has been
        added to the Playlist using the so-called Album mode,
        available from the popup menu in Music Store. If you tend to
        use it extensively, there is an option on the
        <gui>Settings / Playlist</gui> page to make it default, so drag
        &amp; drop and adding via keyboard shortcut will use this mode
        automatically.</p>

        <p>Aqualung supports playlist tabs, which allow you to have
        multiple playlists for your music at the same time, very
        similarly to multiple tabbed browsing in Firefox. Creating new
        tabs is possible via CTRL+T in the Playlist window,
        double-clicking on the tab bar, or using the right-click
        context menu of the tab labels. This context menu can also be
        used to rename tabs, close other tabs, or undo
        closing. Another trick is that middle clicking on an item in
        the Music Store adds the content to a new playlist tab, which
        will be named after the middle-clicked element by default.
        Closing a tab has several ways: clicking the close button
        located on each tab, middle-clicking on a tab, using the tab
        context menu, or by pressing CTRL+W in the Playlist
        window. Undo close tab is possible until you quit
        Aqualung. Tabs can be reordered via drag &amp; drop.</p>

        <p>The contents of the Playlist can be saved and restored
        automatically when the program exits and starts up, and/or
        periodically with adjustable interval. (Whether this should be
        done is a configuration option, covered later.) In addition
        to this, you can save the Playlist manually at any time, or
        load a previously saved playlist file. To do this, right-click
        in the Playlist area, which will bring up a popup menu with
        these features.</p>

        <p>The Playlist is saved as an XML file, unless you specify a
        filename ending in <file>.m3u</file>, in which case it is
        saved in M3U format (one filename per line). When saving an
        XML playlist, you should
        normally end your filename with <file>.xml</file> <ndash/>
        however, this is only good practice and not necessary. If you
        choose <gui>Save all playlists</gui>, the XML will be a
        multi-tabbed playlist, containing all tabs, while <gui>Save
        playlist</gui> saves the current playlist only. When saving
        all playlists, it will always use the XML format, as the M3U
        file format does not support multiple playlists. Note that the
        XML playlist file format is not compatible with Winamp/XMMS
        <file>.m3u</file> files. However, Aqualung will open playlists
        in M3U and PLS formats whenever possible.</p>

        <p>When opening a multi-tabbed playlist, all opened tabs will
        be appended after the present ones, and the existing tabs will
        be remained intact, regardless of whether you chose loading
        (which normally clears the current playlist before adding) or
        enqueueing (which appends songs to the playlist). Opening any
        other playlist type (single XML playlist created by <gui>Save
        playlist</gui>, M3U or PLS playlists) will behave according to
        the option you chose (<q>Load in new tab</q>, <q>Load</q> or
        <q>Enqueue</q>).</p>

        <p>The usual cut, copy and paste functions are accessible via
        keyboard shortcuts, and work across playlist tabs as
        well. Rearranging tracks by drag &amp; dropping items is also
        supported. You can even drag a track from a playlist into
        another, by dragging on the tab first in order to switch to
        the target playlist. The only restriction is that album nodes
        cannot be pasted or dropped inside another album node.</p>

      </subsection>


      <subsection title="Music Store" key="store" img="store.png">

        <subsubsection title="Overview">

          <p>The Music Store is a simple database of all your
          music. The central philosophy of this program is that you
          have a large storage (ideally an entire hard drive or a
          separate partition) to store all your music files. This is
          not necessary for the program to work. The audio files can
          be scattered around your system as long as you have read
          permissions to them. However, it is strongly recommended
          that you devote a separate directory for all the music (for
          example, <file>/music</file> would be a convenient place to
          store files that are owned by root, but readable by all
          users). Moreover, you can maintain several collections on
          different machines this way, and share them with other users
          via NFS, while keeping a (probably smaller) collection on
          your local hard drive.</p>

          <p>In these central directories, create subdirectories for
          each artist you have CDs from. The directory names do not
          have to contain the exact names, you can for example create
          <file>/music/ledzep</file> for Led Zeppelin,
          <file>/music/crimson</file> for King Crimson,
          <file>/music/hendrix</file> for Jimi Hendrix and so on. In
          these directories, create subdirectories for each CD you
          have. Once again, the directory names for the records do not
          need to fully contain the record titles; they can be short
          and without spaces and special characters.</p>

          <p>Into the directories of records, you should rip the CD
          using the built-in ripper of Aqualung, tagging the files and
          adding the record to the Music Store as part of the
          process. See <ref refkey="cd">this section</ref> for
          details.</p>

        </subsubsection>

        <subsubsection title="Building or Updating a store from filesystem">

          <p>Aqualung comes with a Music Store Builder facility, which
          allows you to easily create a store from your existing audio
          files. This is essential if you already have a large music
          collection on your harddrive. Please make sure to read <ref
          refkey="builder">this section</ref> to understand the
          concepts and usage of this feature.</p>

        </subsubsection>

        <subsubsection title="Arranging your collection">

          <p>Each store, artist, record and track has fields you can
          fill in via bringing up the <gui>Edit</gui> dialog for that
          item. The <gui>Visible name</gui> is obviously the string
          that will appear in the Music Store tree, and in the
          Playlist. The <gui>Name to sort by</gui> is a string key
          used for sorting items on the same level of hierarchy (all
          artists, records of a given artist, and tracks of a given
          record).</p>

          <p>For artists, you should enter the same here as the
          <gui>Visible name</gui> for ordinary band names (you can use
          copy &amp; paste to do that, or simply press ENTER while the
          cursor is in the visible name entry). However, for some
          artists you will enter a slightly modified string:
          <q>Mayall, John</q> or just <q>Mayall</q> for John Mayall,
          for example. This is to ensure that <q>John Mayall</q>
          (which is the visible name) appears between
          <q>Mahavishnu</q> and <q>Morphine</q>, and not somewhere
          near <q>Jethro Tull</q>.</p>

          <p>Records have a <gui>Year</gui> field to store the release
          year. The <gui>Name to sort by</gui> field should usually be
          this year, but you can use explicit numbering or whatever
          you like as well. If multiple records of an artist have the
          same year (double albums, multi-CD collections, or just
          multiple studio albums published in the same year), you may
          use e.g. <q>1969-1</q>, <q>1969-2</q>, etc. to keep them in
          proper order.</p>

          <p>As for tracks, a two-digit, zero-padded decimal numbering
          would be excellent for the sort key. If you added tracks to
          the records using the aforementioned <gui>Auto-create tracks
          from these files</gui> feature of the Record add dialog, the
          tracks will be automatically numbered for you this way.</p>

          <p>Last but not least, every item has a <gui>Comment</gui>
          field that may contain multiple lines of text, and is
          perfectly optional to use for any store, artist, record or
          track. When you have entered something in this field, it
          will be displayed in the lower area of the Music Store
          window when the corresponding item is selected in the
          tree. Use this to store miscellaneous data, such as birth
          dates of artists, or comments like <q>Recorded live at Royal
          Albert Hall, ...</q> or <q>Digitized from original LP</q>
          for records, and movement subtitles for tracks that have
          them.</p>

        </subsubsection>

        <subsubsection title="Dealing with multiple stores">

          <p>As mentioned before, you may maintain several collections
          of audio files on several machines. Each collection is
          arranged in an artist/record/track hierarchy, and appears
          under a store item in the Music Store tree. The metadata
          describing one collection is located in one file on your
          filesystem.</p>

          <p>On the <gui>Settings / Music Store</gui> page you can
          specify several database files whose content is intended to
          appear in your Music Store. If a given file is unavailable,
          the corresponding store item will be missing from the Music
          Store. If the file is readonly, you can play the music, but
          you won't be allowed to change (add, edit, remove, etc.) the
          items in the store. Finally, if you have write permission on
          the file, you will be allowed to change the items.</p>

          <p>The order in which the stores appear in the Music Store
          is the order of the corresponding database files in the
          list. The list can be reordered via drag &amp; drop.</p>

        </subsubsection>

        <subsubsection title="Handling file metadata" key="handling-file-metadata">

          <p>The program can read and write all sorts of metadata
          (normally referred to as <q>tags</q> in everyday speech)
          embedded in the audio files themselves. To see such metadata for
          a particular track, you will utilize the <gui>File info</gui>
          dialog accessible from the Music Store (right-click popup menus
          for Tracks, or press <q>i</q>) and the Playlist (right-click
          popup menu for Playlist entries, or press <q>i</q>).</p>

          <p>When you open the <gui>File info</gui> dialog from the
          Music Store, you will find buttons to the right of every
          metadata field that was read from the file (unless the store
          is readonly). By pressing these buttons, the associated data
          will be imported into the corresponding field of the
          relevant Track. For metadata fields that don't have a
          corresponding field in the Music Store, you can append their
          contents to the <gui>Comment</gui> field as a catch-all
          solution.</p>

          <p>Please make sure to check out the comprehensive guide to
          Aqualung's <ref refkey="meta-support">metadata
          capabilities</ref>.</p>

        </subsubsection>

        <subsubsection title="CDDB Support">

          <p>Aqualung supports retrieving matches from a CDDB
          database, as well as submitting new records or updating
          existing ones. The features are available by right-clicking
          on a record in the Music Store and choosing the appropriate
          menu item.</p>

          <p>The CDDB query option starts a query (which can last a
          bit long if there are a lot of matches), and displays a
          dialog with the search results. It tends to work even if you
          have already encoded your audio files in a lossy format.</p>

          <p>If there are multiple matches, you can select any of them
          using the combo box at the top of the dialog. The displayed
          fields are all editable, which is useful in case you find no
          fully acceptable match, but want to use one that is almost
          perfect. The track names can be edited by double-clicking on
          the desired track, or single clicking on an already selected
          entry.</p>

          <p>By pressing the <gui>OK</gui> button the track names of
          the currently selected lookup results will be propagated
          into the Music Store. The artist name, record title and year
          are not automatically set, but can be imported using the
          <gui>Import as Artist</gui>, <gui>Import as Title</gui> and
          <gui>Import as Year</gui> buttons on the right. Record title
          and year can also be imported as sort keys, after you once
          pressed the corresponding import button. Other data
          (category, genre and extended data) can be appended to the
          comment field of the record in question using the <gui>Add
          to Comments</gui> button next to the appropriate text
          entry.</p>

          <p>The CDDB submission option brings up a dialog which
          contains the artist, title, year, category, genre and
          extended data fields, and the track list. All fields
          (including track names) are editable. The artist, title,
          year and category fields are mandatory, the genre and
          extended data are optional. Track names should be all set as
          well. You are also recommended to comply with the <a
          href="http://www.freedb.org/en/faq.3.html#22">naming
          rules</a> when submitting new records.</p>

        </subsubsection>

        <subsubsection title="Audio CD" key="cd">

          <p>If Aqualung was compiled with Audio CD support, a store
          called <q>CD Audio</q> appears as the first store in Music
          Store. This special store contains a node for each drive in
          your machine. Detecting hot-swappable devices such as
          external USB drives is supported, so you don't need to
          restart the program after plugging in your drive. Aqualung
          will notice not only the change of discs in devices, but
          device changes themselves, too.</p>

          <p>When you insert a CD in a drive, the corresponding node
          will contain the audio tracks on that disc. The artist,
          record and track names are automatically set from CD-Text
          information if found on the CD, or a CDDB lookup.</p>

          <p>The drive nodes have options available from the popup
          menu for adding content to the Playlist, manual CDDB lookup
          and submission just like normal album nodes do. They have
          some further CD specific options as well.</p>

          <p>The most important feature is ripping the CD. Choosing
          <gui>Rip CD...</gui> from the popup menu will bring up a
          dialog with several options broken into notebook pages. The
          <gui>Source</gui> page is for selecting the tracks to be
          ripped, and specifying the artist, record and track
          names. If the CDDB lookup was successful, these fields are
          initialized appropriately. On the <gui>Output</gui> page you
          can select the directory where to put the audio files, and
          optionally the music store to which you would like to add
          the ripped CD. The destination directory must be empty; it
          is best to create a fresh new directory each time you rip a
          CD. Only music stores with write permission are offered, so
          you might not see all of them. The desired file/encoding
          format can also be selected, along with settings concerning
          quality, such as compression level or bitrate. The supported
          destination formats are WAV, FLAC, Ogg Vorbis and MP3. There
          is also an option to set whether the files should be tagged
          with metadata. (WAV does not have a tagging mechanism. Other
          formats are tagged according to their native tagging
          mechanism.)</p>

          <p>CD Ripping always happens with maximum available speed
          and with error correction modes manually set before every
          run on the last page titled <gui>Paranoia</gui>. Here you
          can basically choose between safe and slow ripping, and
          faster, but more insecure operation. The latter might be
          useful if you know by experience that your equipment is
          reliable, and the CD you are about to rip is not scratched
          or dirty. Even so, it is probably a good idea to use the
          available extra error protection unless you are really in a
          hurry.</p>

          <p>It is possible to display information about the inserted
          disc (CD-Text), or the drive itself (general info, reading
          or writing capabilities, etc.). The tray can also be
          ejected, if the driver supports this operation. Note that
          ripping and playing a CD at the same time is impossible for
          obvious reasons.</p>

        </subsubsection>

        <subsubsection title="Podcast support">

          <p>If Aqualung is compiled with podcast support, you will have a
          store called <q>Podcasts</q> in your Music Store. All feeds you
          are subscribed to will show up as nodes under this store.
          Subscriptions can be made using the <gui>Subscribe to new
          feed</gui> right-click menu of the <q>Podcasts</q> store.</p>

          <p>When you subscribe to a feed, you need to enter the URL
          of the feed and a directory where to put the downloaded
          files. Supported feed formats are all versions of RSS and
          Atom.</p>

          <p>Aqualung can automatically check for updates and download
          new files. The check interval can be specified in hours,
          with a 0.25 hour resolution. The automatic update facility
          can be disabled for a feed by unchecking the checkbutton
          before the name of this option.</p>

          <p>There are three different limits that you can apply on a
          per feed basis. All of them are optional, and can be turned
          on/off with their respective checkbutton.</p>

          <ul>

            <li>Maximum number of items: the number of downloaded
            files will never exceed this. If necessary, Aqualung will
            delete older files to meet this requirement.</li>

            <li>Remove older items: Aqualung will automatically remove
            files that are older than the given number of days. If a
            feed offers files for download that are older than this
            limit, they won't even be downloaded. Note that if a feed
            incorrectly specifies the date of the items, it may happen
            that no files are downloaded due to this limit <ndash/> if
            so, turn it off, and update again.</li>

            <li>Maximum space to use: the downloaded files will not
            occupy more space than specified by this option.</li>

          </ul>

          <p>If some files need to be deleted due to limit
          constraints, the oldest one will be removed first to keep
          fresh material available as long as possible. Once you have
          subscribed to a feed, you can edit the check interval and
          limit settings using the <gui>Edit feed</gui> menu
          item.</p>

          <p>New feeds are appended to the <q>Podcasts</q> store.
          They can be reordered later using the <gui>Reorder
          feeds</gui> menu item of the <q>Podcasts</q> store.</p>

          <p>There is a check menu item called <gui>Automatically
          update feeds</gui> in the <q>Podcasts</q> store popup menu
          to globally enable/disable automatic feed updates for all
          feeds. If unchecked, the <gui>Edit Feed</gui> dialog will
          show a note about this option being disabled instead of the
          feed's own check interval.</p>

          <p>When a feed is being updated, its title is changed to
          indicate how many new files are to be downloaded, and shows
          the completion ratio as well. You can abort an update
          process by clicking the <gui>Abort ongoing update</gui>
          right-click menu item of the feed in question, which is
          naturally available only during updates.</p>

        </subsubsection>

      </subsection>

      <subsection title="JACK Port Setup" img="jack.png">

        <p>If you use JACK output, you need this dialog to route the
        outputs of the program somewhere (most likely to the playback
        ports representing the soundcard driver). If you want the
        outputs to be connected automatically to the first two
        hardware playback devices, use the <cmd>-a</cmd> (or
        <cmd>--auto</cmd>) command line option.</p>

        <p>On the left, each output port has a list of its current
        connections. By clicking on any list item, that connection
        will be removed. The <gui>Clear connections</gui> button
        removes all connections from the output ports.</p>

        <p>The notebook on the right has a page for all client
        programs and hardware devices available to the JACK
        server. Naturally only those are shown which are data sinks
        (hardware playback devices or inputs of JACK clients), thus
        connectable to outputs which are data sources. By selecting a
        notebook page, you will see a list of that client's input
        ports. Clicking on a list item connects the port to the
        currently selected Aqualung output port (which has a blue
        header). You can change the selected output port by clicking
        on the unselected (grey) list header. When you add connections
        to the output ports, the selection alters between the two
        outputs so connecting both outputs is very fast and easy.</p>

        <p>If you start up another JACK client while the dialog is
        open, you may press the <gui>Rescan</gui> button to make it
        appear in the notebook. Closing and re-opening the dialog has
        the same effect, since JACK ports are re-read and a new dialog
        instance is built every time.</p>

      </subsection>

      <subsection title="Skin Chooser">

        <p>This dialog lets you choose from the available skins at any
        time. All officially supported skins are shipped with
        Aqualung, and installed in the system-wide skin directory
        during <cmd>make install</cmd>. Skins placed in the local skin
        directory will only be locally available, which is useful for
        developing new skins or experimenting with the existing
        ones. If there are skins in the system-wide directory and the
        local directory having the same name, the local one takes
        precedence.</p>

      </subsection>

      <subsection title="System Tray Support" img="systray.png">

        <p>When compiled with Systray support, Aqualung will place its
        icon in the system tray (notification area), and lets all of
        its windows be closed while still playing music. In this mode
        pressing the upper right X on the main window will not exit
        the program, only hide its windows.</p>

        <p>Clicking on the systray icon with the left mouse button
        will toggle visibility of the program's windows. Clicking with
        the right button will bring up a popup menu allowing
        showing/hiding the windows, basic cueing, and quitting
        Aqualung.</p>

        <p>The systray icon has a tooltip displaying the same text as
        the main window's title. So it's easy to see what track is
        currently playing, and also the Aqualung instance ID (in case
        of more instances).</p>

      </subsection>

    </section>

    <section title="Supplemental features">

      <subsection title="Exporting files from the Music Store or Playlist" key="export-files">

        <p>It is possible to export files from the Music Store or
        Playlist to external formats. This is especially handy if you
        own a portable music player, since it can be easily filled
        with music you already have on your computer, transcoding and
        tagging the files so they can be readily used by the
        device. The feature is available from the right-click popup
        menus (both in Music Store and Playlist), and via the shortcut
        <q>x</q> or <q>X</q> (in Music Store only). It operates on the
        selected Music Store node, or the selected tracks in the
        Playlist.</p>

        <p>The export dialog handles the settings of output directory,
        filename and file format. Subdirectories can be created for
        artists and/or records, with adjustable limit for the length
        of the created directory names. The actual filename is
        generated using the filename template. This template is very
        similar to the well-known <gui>Title format</gui> in <ref
        refkey="settings-general">Settings / General</ref>, only it
        accepts a few more special sequences: <q>%o</q> for the
        original audio filename (without extension), <q>%n</q> for the
        track number (two digit, zero padded), <q>%i</q> for an
        identifier which is unique within an export session, and
        <q>%x</q> for the file extension. The latter is determined by
        the output file format, and will be one of <q>flac</q>,
        <q>ogg</q>, <q>mp3</q> or <q>wav</q>.</p>

        <p>The file format setting is exactly the same as with CD
        ripping, refer to <ref refkey="cd">this section</ref> for
        details.</p>

        <p>The metadata of the exported files is transcoded to the new
        format as well as the audio data; read more about this <ref
        refkey="export-meta-transfer">here</ref>.</p>

      </subsection>

      <subsection title="LADSPA plugins">

        <p>One great feature of the program is that you can apply
        LADSPA plugins to the music. You can use the equalizer of your
        choice instead of a built-in one, along with other
        plugins. You can process your sound with Aqualung in ways that
        the author of this program never thought of. A recommended set
        is <a href="http://tap-plugins.sourceforge.net">TAP-plugins</a>.</p>

        <p>Of course, faithful reproduction of music does not require
        or permit pervasive signal processing, since that is not the
        purpose of such activity. However, the technology is at your
        disposal and it's up to you to use or misuse it. It may be
        necessary to adapt your listening gear to the acoustic
        environment, using small amounts of equalization preferably in
        a subtractive manner. In addition to this, I also like to
        spice my tracks with a small amount of tubewarmth to feel that
        warm tube sound even with my transistor amplifiers, and to
        bring out even the finest details of the music.</p>

        <p>The plugin chain you build is automatically saved and
        restored, so once you get it right for your listening
        environment, you should rarely need to touch it.</p>

        <p>Some tricks concerning the LADSPA patch builder:</p>

        <ul>
          <li>
            Multiple plugins can be selected from the available
            plugins list and added at once by clicking on the <gui>Add
            button</gui> or pressing <q>a</q> or <q>A</q>.
          </li>
          <li>
            A single plugin can be added immediately by
            double-clicking it in the available plugins list.
          </li>
          <li>
            Plugins in the running list can be (un)bypassed with the
            middle mouse button.
          </li>
          <li>
            The configuration window of the running plugins can be
            brought up by double-clicking on them (same as clicking on
            the <gui>Configure</gui> button).
          </li>
          <li>
            If a plugin is selected in the running plugins list,
            pressing DELETE will remove it (same as pressing the
            <gui>Remove</gui> button).
          </li>
          <li>
            Running plugins can be rearranged at any time (changing
            the order in which they are processed) via dragging them
            with the mouse.
          </li>
          <li>
            In the configuration windows of plugins, setting input
            controls back to their default value is possible by
            shift-clicking on the slider. This does not work for
            toggled or integer inputs (those that don't have a slider
            displayed for them).
          </li>
        </ul>

      </subsection>

      <subsection title="The RVA system" key="rva">

        <p>RVA stands for Relative Volume Adjustment, and refers to a
        system that is supposed to compensate for the fact that the
        perceived volume levels of tracks from different records are
        sometimes quite different. With usual players, you are left
        with the possibility to adjust the volume manually, when
        necessary; but not with Aqualung.</p>

        <p>Besides having a fully-fledged system for RVA, Aqualung
        also supports using already existing ReplayGain or RVA
        information present in your audio files' metadata. If you are
        interested in this, read on, but make sure to also check out
        <ref refkey="meta-rg-and-rva">this section</ref>.</p>

        <p>You have to do two things prior to using RVA in
        Aqualung. First, you have to calculate the volume of the
        tracks you want affected by the RVA system. To do this, use
        the <gui>Calculate volume</gui> option in the Music Store
        found in the right-click popup menus of Stores, Artists,
        Records and Tracks. When you activate this option, a small
        window will pop up with a progress bar. You can move this
        window out of your way, and proceed with using
        Aqualung. Processing will be carried out in the background,
        and should not affect your ability to play music at
        all. Calculated volume levels will be saved and restored with
        the rest of the Music Store. The values are shown in the
        <gui>Edit track</gui> dialog.</p>

        <p>When you are done with this, open the <gui>Settings</gui>
        dialog (right-click almost anywhere in the main window), and
        select the <gui>Playback RVA</gui> notebook page.</p>

        <p>If <gui>Enable playback RVA</gui> is unchecked, the whole
        RVA system is turned off. No tracks receive adjustment. If
        playback RVA is enabled, you can select a listening
        environment that matches your setup. The idea is that the
        better your environment, the smaller adjustment you need to
        enjoy the music. If you work in a noisy workshop (and listen
        to Aqualung-played music) then it is best to minimize the
        volume differences between tracks so all tracks will be
        uniformly audible at a particular volume setting. If you can
        afford to listen to music in a silent room with high quality
        headphones or good near-field monitors, you should choose
        <gui>Audiophile</gui> which will yield no change to
        volumes.</p>

        <p>The diagram shows the input/output transfer function
        applied to the previously measured track loudness to obtain
        the adjustment needed for a particular track. The diagram is
        24 dB large in both directions, with the (0, 0) point being in
        the upper right corner. The blue line shows the identity
        function (no change), while the red line shows the output
        volume (the actual transfer function). The adjustment applied
        at a particular track volume is the vertical distance between
        the two lines at that position. The transfer function is
        linear. You can use the <gui>Reference volume</gui> and
        <gui>Steepness</gui> controls to change its position.</p>

        <p>In most cases, it is desirable that tracks of the same
        record receive the same adjustment, so as to preserve the
        volume differences internal to the record. This can be enabled
        by checking <gui>Apply averaged RVA to tracks of the same
        record</gui>. When enabled, volume levels of the same record
        will be averaged and all tracks will be adjusted by an average
        value. Please note that measured volume levels are converted
        to RVA values when you add something from the Music Store to
        the Playlist. Therefore, this feature works only when you add
        an Artist or a Record. If you add a record by adding all the
        Tracks manually one after another, they will all receive
        independent RVA values. Also, changing RVA settings will not
        affect entries already in the Playlist.</p>

        <p>There are many records having one or two tracks that really
        stand out of the average volume level. (For example, there is
        one very silent track on an otherwise loud record.)  In this
        case, these tracks would pull down the average volume. To get
        around this, you can adjust a threshold that will be used to
        sort out tracks that stand out too much and will be
        disregarded when computing the average volume.</p>

        <p>You can select whether you want to specify a threshold in
        linear volume units [dBFS] or you want to specify a percentage
        of the standard deviation of the set of individual track
        volumes to use as a threshold. The default values should work
        well for the vast majority of records. If you always want
        every track's volume to count in the average adjustment of the
        record, choose the linear threshold and set it to a really big
        value (say, 30 dB) so all tracks will be within this
        range.</p>

        <p>For external tracks added to the Playlist and having no
        volume information, you can specify a fixed RVA value using
        <gui>RVA for Unmeasured Files</gui>. This applies to all
        tracks coming from outside the Music Store or a native XML
        playlist file, and to URLs.</p>

        <p>You also have the possibility to always use a manually
        specified, fixed value as RVA for a particular track. In the
        <gui>Edit track</gui> dialog for that track, check the
        <gui>Use manual RVA value</gui> checkbox and set the value
        with the spinbutton on its right. If you e.g. import an
        ID3v2.4 RVA tag from an MP3 file, it will also set this field
        thereby circumventing Aqualung's own RVA calculation.</p>

        <p>It is possible to have more volume calculations in progress
        at a time. If you need to measure a few records, you don't
        have to wait for the previous one to finish. RVA calculations
        can also be paused, so should you suddenly need the whole CPU
        capacity, you don't have to abort the process <ndash/> just
        pause it, and resume when things go down.</p>

      </subsection>

      <subsection title="Music Store Builder" key="builder">

        <p>Aqualung's Music Store Builder allows you to easily create
        a store from your existing audio files. This is essential if
        you already have a large music collection on your
        harddrive.</p>

        <p>The Builder supports two approaches for automatically
        adding audio files to the Music Store. The directory driven
        mode requires the collection to be organized in a strict
        filesystem structure, where the directory structure itself
        specifies which files belong to a record, and which records
        belong to an artist. The structure should conform to one of
        the following patterns:</p>

        <tabular>
          <tr>
            <td>a)</td>
            <td>root / record / track</td>
          </tr>
          <tr>
            <td>b)</td>
            <td>root / artist / record / track</td>
          </tr>
          <tr>
            <td>c)</td>
            <td>root / artist / artist / record / track</td>
          </tr>
          <tr>
            <td>d)</td>
            <td>root / artist / artist / artist / record / track</td>
          </tr>
        </tabular>

        <p>Pattern a) is useful when you do not have separate
        subdirectories for artists, only for records. The b) means
        that each artist and record has its own subdirectory. It
        corresponds to the structure introduced above along with the
        Music Store. The patterns c) and d) are for those who have too
        many artists to keep them at the same level; you may thus have
        a subdirectory for every artist starting with letter a, b,
        etc., or you can even dedicate two levels to them, perhaps as
        <file>b/be/beatles</file>, <file>c/cr/crimson</file>, etc.</p>

        <p>The independent mode does not follow any directory
        structure, only searches for audio files recursively starting
        from root. This doesn't allow the Builder to perform CDDB
        lookups, so only metadata and filename transformations are
        available with this mode. If your audio files are basically
        organized in a directory structure that allows a directory
        driven build to be performed, but you also happen to have
        audio files on higher (record or artist) levels, run the
        Builder in directory driven mode first, then use the
        independent mode on the same root directory to add the
        outstanding files too.</p>

        <p>The Builder can gain information about your music from
        three sources: metadata (if your audio files are correctly
        tagged), CDDB lookups, and the filesystem names of the audio
        files and directories themselves.</p>

        <p>If you are up to building a new store, first create an
        empty store (right-click in Music Store, then choose the
        <gui>Create empty store</gui> item), then right-click on the
        new store and choose <gui>Build / Update store from
        filesystem</gui>. After selecting the desired building mode,
        the builder dialog appears with several options broken down
        into five notebook pages. Later, if you only want to update
        the content of a store, you can start a build process on a
        non-empty store as well.</p>

        <p>On the <gui>General</gui> page you have to select the root
        directory of your music collection. With the directory driven
        mode, the appropriate structure should also be selected.</p>

        <p>You can exclude files from the build process that match a
        wildcard pattern (or more precisely, at least one element in a
        list of wildcard patterns). The list is comma-separated,
        e.g. <q>*.jpg,*.png,*.gif</q> will cause all files having jpg,
        png, or gif extension to be left out. Note that hidden files
        (whose name starts with a period) are always excluded. Also
        note that no spaces should be used around the commas, because
        they would be counted in the wildcard patterns, causing a lot
        of headache.</p>

        <p>Similarly, you may include only those files that match a
        wildcard pattern. The syntax is the same as with the
        exclusion. This easily allows you to build a store containing
        music e.g. encoded with FLAC, and another store for Ogg, while
        the audio files can be placed together even in the same
        directory. Exclude and include patterns are
        case-insensitive.</p>

        <p>If you choose to reset existing data, only track name,
        length, manual RVA and empty comment fields will be
        overwritten, and the latter two are only if you have enabled
        importing the Replaygain and Comment tags on the Track
        tab. Removing non-existing files will remove all tracks from
        the store that no longer exist on the filesystem. Empty
        artists and records will also be removed.</p>

        <p>The builder dialog has separate notebook pages for artists,
        records and tracks. The settings made on a page only concern
        the appropriate category (either artist, record or track). The
        operations and transformations are performed in the same order
        as they are placed on the page, from top to bottom.</p>

        <subsubsection title="Data sources">

          <p>With each mode you can set the priority of data sources
          for artist names, record titles and tracks independently
          (highest comes first). Simply drag &amp; drop the lines of
          the list to achieve the desired order. For example, if you
          have proper tags in you audio files for track names only,
          but none for artists and records, you may use metadata for
          tracks at first place, and use CDDB for artists and records
          instead. The data sources can also be disabled by clicking
          on the check boxes.</p>

          <p>The Builder looks for usable data in the given priority,
          and will use the first suitable one.</p>

          <p>A short note on the Filesystem source: when using the
          directory driven mode with structure a), the artists and
          records will have the same filesystem name, which is the
          name of the record directory. Using pattern b), c) or d)
          will result in all artists, records and tracks having the
          name of their respective directory (or file, for tracks) as
          the filesystem name. With c) and d), the name of the
          rightmost artist directory is used. When using the
          independent mode, artists, records and tracks will have the
          same filesystem name, which is the filename of the audio
          file being imported.</p>

          <p>Regardless of the data source that won the contest for
          being the source of your artist, record or track name, you
          can perform several transformations on this string before
          accepting it as final.</p>

        </subsubsection>

        <subsubsection title="Regular expressions">

          <p>The main goal of the regexp module is to perform
          <cmd>sed</cmd>-like substitutions, allowing you to extract
          the artist, record or track name from the string. It has the
          effect of a <cmd>sed s/regexp/replacement/g</cmd>
          command. The regexp must not match the empty string (the
          only exception is leaving the regexp entry empty, which
          disables the whole regexp module). The replacement is
          allowed to be empty in which case the matched parts are
          deleted. The replacement may also contain the special
          escapes <cmd>\1</cmd> through <cmd>\9</cmd> to refer to the
          corresponding matching sub-expressions in the regexp. See
          <cmd>sed(1)</cmd> and <cmd>grep(1)</cmd> for more
          information on sed substitution and regexp syntax. There is
          a sandbox where you can enter a string and see how it would
          be transformed, providing a safe environment for
          experiments.</p>

        </subsubsection>

        <subsubsection title="Predefined transformations">

          <p>These provide some basic fixes, such as removing the
          extension or leading numbers, converting underscores to
          spaces, and trimming leading, tailing or multiple
          spaces. You can use them together with the regexp module as
          well, in which case only the replacement will be
          transformed, as expected.</p>

        </subsubsection>

        <subsubsection title="Capitalization">

          <p>Finally, with this module you can force a capitalization
          pattern on the string. The force case entry is a
          comma-separated list of words or expressions that will be
          left in the form you entered them. An obvious example is the
          case of Roman numbers.</p>

          <p>After the standard modules present for artist, record and
          track names, there are some category dependent settings. For
          artists and records you can set the source of the sort name
          field, for tracks you can decide whether to import the
          Replaygain and Comment tags, if available.</p>

          <p>Once you are satisfied with the settings click
          <gui>OK</gui>. A new window showing the progress is
          displayed, and the store is filled up. You can abort the
          process if you encounter some error or weirdness, or just
          want to refine some settings.</p>

        </subsubsection>

      </subsection>

    </section>

    <section title="Metadata support" key="meta-support">

      <p>Aqualung has extensive support for viewing and editing
      most metadata formats in use today. This section acts as a
      reference of the program's metadata-related capabilities and
      behavior.</p>

      <p>Metadata support is implemented in Aqualung by means of the
      libraries that support the soundfile formats themselves, as well
      as additional code in Aqualung. That is, no external
      metadata-handling library is employed. This has not always been
      the case, and is a result of major refactoring carried out after
      having poor experience with metadata libraries. This means
      metadata support is inherently present in Aqualung for all
      soundfile formats that are <a
      href="http://aqualung.factorial.hu/compiling.html">compiled
      in</a>.</p>

      <subsection title="Manual editing">

        <p>The <gui>File info</gui> dialog (<ref
        refkey="handling-file-metadata">accessible</ref> from the
        Music Store and the Playlist) acts as a graphical shell for
        the metadata editing capabilities. Its usage is fairly
        self-explanatory. For read-only tags, the dialog has no
        editing controls, so the only available operation is viewing
        the fields, copy-pasting them to another location, or (if the
        dialog was opened from the Music Store) importing the field to
        the Music Store database. Embedded images can also be saved to
        file.</p>

        <p>For writable files, the metadata is editable. Each metadata
        tag present in the file will be displayed in a separate
        notebook tab. On each tab the information present in a tag is
        usually organized as a list of frames, displayed in a
        <q>key:value</q> fashion. The values of each frame are
        editable, mostly by means of a simple text entry, but in some
        cases other widgets (such as a drop-down menu) may also be
        present. The frame itself can be removed by clicking on the
        frame's rightmost icon displaying a trash can. Some frames
        cannot be removed, because their existence is mandated by the
        corresponding metadata standard for the tag. In this case the
        trash can is greyed out.</p>

        <p>Adding new frames is possible via the drop-down box at the
        bottom of the tab. This box contains all possible frames that
        you can add to the present tag. Some frames can only occur
        once in a tag; in this case after adding it once (or if a
        frame of this type is already present in the tag) it is no
        more present in the drop-down box.</p>

        <p>Adding and removing whole tags is also supported. Just
        press the trash can icon at the bottom right corner of the
        tab, and the whole tag will be removed. Adding a new tag is
        possible via the drop-down box at the bottom of the
        window. This box contains all possible tags you can add to
        this file. This depends on the audio file format and what tags
        are already present in the file (naturally, only one instance
        of a particular tag may exist in a file).</p>

      </subsection>

      <subsection title="Mass tagging">

        <p>Aqualung supports mass tagging, that is, writing data from
        the Music Store into file metadata. The feature can be invoked
        on a store, artist, record or a single track using the
        <gui>Batch-update file metadata...</gui> popup menu
        item. Supported metadata fields are artist, record and track
        name, track number, track comment and year. The names are
        copied from the visible name fields of the artist, record and
        track, the track number and comment are set from the sort name
        and comment field of the track, respectively. The year is
        extracted from the sort name field of the record.</p>

      </subsection>

      <subsection title="Metadata-related behavior">

        <subsubsection title="Configuration" key="metadata-config">

          <p>Configuring metdata-related behavior can be done in
          <gui>Settings / Metadata</gui>. The file metadata will
          always be used if available when adding external files
          (i.e. not from the Music Store) to Playlist. If no metadata
          is found, the filename will be used as a title string. In
          such cases the <gui>Adding files to Playlist</gui> option
          controls whether to use the basename only instead of the
          full pathname. You can utilize filename extension removal
          and substitution of underscores to space as well.</p>

          <p>It is possible to select which ReplayGain tag should be
          used in case ReplayGain information is found in a file. This
          should be set according to your preference for Album-based
          or Track-based volume averaging. If the requested field is
          not found, the other one is checked and if that exists, it
          is used instead.</p>

          <p>For the metadata editor (<gui>File info</gui> dialog) you
          can choose whether you want to set the contents of newly
          added frames on the basis of another existing tag's
          equivalent frame. For example, if this option is enabled,
          adding a <q>Title</q> frame to a newly added APE tag will
          automatically fill it in, provided that there is e.g. an
          ID3v2 tag in the same file that already has a <q>Title</q>
          frame. If this option is unset, newly added fields will be
          blank.</p>

          <p>The last group of options controls the preferred set of
          tags in MPEG audio files. Because these files can have
          ID3v1, ID3v2 and APE tags in any combination, it is
          essential to set this to match your policy regarding the
          tagging of these files. These settings affect creating (via
          CD ripping or file export) or batch tagging MPEG audio
          files.</p>

        </subsubsection>

        <subsubsection title="Precedence of metadata information" key="meta-precedence">

          <p>Whenever there is a generic request for some information
          concerning a file (e.g. <q>Who is the artist?</q>) we do not
          want to explicitly specify which metadata tag should be used
          to retrieve the desired piece of data. As a consequence, all
          tags present have to be checked. However, since not all tags
          are equally capable of storing well-formed information
          (think of ID3v1 limitations), there should be a preference
          order in which the different tags are queried.</p>

          <p>The preference order:</p>

          <tabular>
            <tr>
              <td>1.</td>
              <td>MPEG StreamMeta</td>
            </tr>
            <tr>
              <td>2.</td>
              <td>Generic StreamMeta</td>
            </tr>
            <tr>
              <td>3.</td>
              <td>Musepack ReplayGain data</td>
            </tr>
            <tr>
              <td>4.</td>
              <td>FLAC pictures</td>
            </tr>
            <tr>
              <td>5.</td>
              <td>Ogg Xiph comments</td>
            </tr>
            <tr>
              <td>6.</td>
              <td>APE</td>
            </tr>
            <tr>
              <td>7.</td>
              <td>ID3v2</td>
            </tr>
            <tr>
              <td>8.</td>
              <td>ID3v1</td>
            </tr>
          </tabular>

        </subsubsection>

        <subsubsection title="ReplayGain and RVA" key="meta-rg-and-rva">

          <p>Aqualung is a ReplayGain-aware music player. You have to
          understand and use the <ref refkey="rva">RVA system</ref> in
          order to make use of this. The RVA system relies on
          pre-stored loudness measurements of files, which Aqualung
          normally does by itself (by selecting the <gui>Calculate
          volume...</gui> option from the popup menus). However, for
          files already containing ReplayGain or RVA information, it
          is possible to use that as the basis of volume
          adjustment.</p>

          <p>One way of doing this is importing the ReplayGain or RVA
          frame to the Music Store as <q>manual RVA</q> (using the
          <gui>File info</gui> dialog opened from the Music Store. In
          this case the stored value is editable via the <gui>Edit
          track...</gui> popup menu item, where you can also specify
          such a value manually, if needed.</p>

          <p>In case there is no <q>manual RVA</q> value stored for
          the file, the RVA system will see if there is a previously
          calculated loudness value stored for this track. If yes,
          this will be the basis of a volume adjustment calculation,
          which is controlled by <gui>Settings / Playback RVA</gui>
          options. However, if the RVA system is enabled and neither
          <q>manual RVA</q>, nor loudness measurement is available,
          Aqualung looks for ReplayGain or RVA information in the file
          metadata. If such information is found, it is used in the
          same way as <q>manual RVA</q>, so the track's playback gain
          will be adjusted by exactly the specified amount.</p>

          <p>There is an important difference between <q>manual
          RVA</q> data coming from a metadata tag or specified
          directly by the user, and loudness values calculated by
          Aqualung. The former is a volume adjustment in itself,
          specifying the amount of cut or boost to apply when playing
          the track. On the other hand, Aqualung's loudness levels
          merely serve as an indicator of the track's loudness, and
          are converted to actual volume adjustment values when adding
          the track to the Playlist, via <ref refkey="rva">Aqualung's
          RVA algorithm</ref>, which is a quite sophisticated tool
          based on listening environments, also supporting
          statistics-based handling of Album-based volume
          averaging.</p>

        </subsubsection>

        <subsubsection title="Metadata transfer when exporting" key="export-meta-transfer">

          <p>When <ref refkey="export-files">exporting files</ref>,
          Aqualung attempts to retain the metadata of the original
          file as much as possible by transcoding metadata into the
          tags supported by the output format. For each frame present
          in the input metadata, it is determined whether it is
          possible to add an equivalent frame to one of the tags
          supported by the output format. If yes, the frame data is
          converted and stored. Note that for each frame type
          (e.g. <q>Title</q>), only one source tag is chosen to be
          copied from even if it is present in more than one tag in
          the input metadata. In this case the tag with the highest
          <ref refkey="meta-precedence">precedence</ref> is used as
          input. Of course, if more instances of the same frame are
          present in the same tag (e.g. multiple APIC frames in an
          ID3v2 tag), they are all transferred if the output metadata
          format supports them.</p>

          <p>This feature essentially means that files are transcoded
          with intelligent metadata transfer. For example, exporting a
          FLAC containing Ogg Vorbis comments and two FLAC picture
          frames to MP3 will result in an MP3 with an ID3v2 having the
          respective text frames, and two APIC frames for the
          pictures.</p>

          <p>When assembling the metadata written to the output file,
          the information from the Music Store or Playlist (Title,
          Artist, Album, Year, Track number) will be used in case the
          source metadata does not contain the appropriate frames.</p>

        </subsubsection>

      </subsection>

      <subsection title="Overview of supported metadata formats">

        <subsubsection title="Metadata support matrix">

          <p>This table shows what tag types are supported for which
          audio formats. Formats for which no metadata support is
          present are omitted.</p>

          <matrix>
            <tr>
              <td></td>
              <td>ID3v1</td>
              <td>ID3v2</td>
              <td>APE</td>
              <td>Ogg Xiph Comments</td>
              <td>FLAC Pictures</td>
              <td>Musepack ReplayGain</td>
              <td>Generic StreamMeta</td>
              <td>MPEG StreamMeta</td>
              <td>Module info</td>
            </tr>

            <tr>
              <td>FLAC</td>
              <td></td>
              <td></td>
              <td></td>
              <td>R/W</td>
              <td>R/W</td>
              <td></td>
              <td></td>
              <td></td>
              <td></td>
            </tr>

            <tr>
              <td>Ogg Vorbis</td>
              <td></td>
              <td></td>
              <td></td>
              <td>R/W</td>
              <td></td>
              <td></td>
              <td></td>
              <td></td>
              <td></td>
            </tr>

            <tr>
              <td>Ogg Vorbis (stream)</td>
              <td></td>
              <td></td>
              <td></td>
              <td>R</td>
              <td></td>
              <td></td>
              <td>R</td>
              <td></td>
              <td></td>
            </tr>

            <tr>
              <td>MPEG Audio</td>
              <td>R/W</td>
              <td>R/W</td>
              <td>R/W</td>
              <td></td>
              <td></td>
              <td></td>
              <td></td>
              <td></td>
              <td></td>
            </tr>

            <tr>
              <td>MPEG Audio (stream)</td>
              <td></td>
              <td></td>
              <td></td>
              <td></td>
              <td></td>
              <td></td>
              <td>R</td>
              <td>R</td>
              <td></td>
            </tr>

            <tr>
              <td>MOD Audio</td>
              <td></td>
              <td></td>
              <td></td>
              <td></td>
              <td></td>
              <td></td>
              <td></td>
              <td></td>
              <td>R</td>
            </tr>

            <tr>
              <td>Musepack</td>
              <td></td>
              <td></td>
              <td>R/W</td>
              <td></td>
              <td></td>
              <td>R</td>
              <td></td>
              <td></td>
              <td></td>
            </tr>

            <tr>
              <td>Monkey's Audio</td>
              <td></td>
              <td></td>
              <td>R/W</td>
              <td></td>
              <td></td>
              <td></td>
              <td></td>
              <td></td>
              <td></td>
            </tr>

            <tr>
              <td>WavPack</td>
              <td></td>
              <td></td>
              <td>R/W</td>
              <td></td>
              <td></td>
              <td></td>
              <td></td>
              <td></td>
              <td></td>
            </tr>

          </matrix>

        </subsubsection>

        <subsubsection title="ID3v1">

          <p>ID3v1 and ID3v1.1 (<a href="http://www.id3.org/ID3v1">http://www.id3.org/ID3v1</a>)
          are fully supported. The difference between the two is the
          presence or absence of a separate Track Number field, which
          was added in ID3v1.1. Aqualung automatically parses the tag
          choosing the right version. When writing the tag, it is
          written as ID3v1.1 if a Track Number frame is present, and
          written as ID3v1 otherwise.</p>

          <p>The Genre field has a fixed set of possible contents in
          ID3v1 and ID3v1.1. This is enforced by a drop-down menu in
          the metadata editor GUI.</p>

        </subsubsection>

        <subsubsection title="ID3v2">

          <p>ID3v2 tags are supported with the restriction that the
          tag MUST be at the beginning of the file. Tag versions
          before ID3v2.3 are considered obsolete and not
          supported. Support for ID3v2.3 tags (<a
          href="http://id3.org/id3v2.3.0">http://id3.org/id3v2.3.0</a>)
          is read-only, meaning that they are parsed, but converted to
          ID3v2.4 whenever saved back to file. ID3v2.4 tags (<a
          href="http://id3.org/id3v2.4.0-structure">http://id3.org/id3v2.4.0-structure</a>)
          are supported in both read and write mode.</p>

          <p>ID3v2.4 tags are always written using UTF-8 as the string
          encoding of non-ASCII text data, and unconditionally
          employing unsynchronisation on all frames. Extended headers
          are neither parsed nor written. Padding is added when
          creating a new file (via CD ripping or file export) or
          rewriting a tag that does not fit in its earlier space
          (e.g. when adding a picture frame, which is usually larger
          than the remaining padding, thus mandating the re-writing of
          the whole file). In these cases the policy for determining
          the amount of padding is that the size of the tag should be
          an integer multiple of 2K, and the added padding should be
          between 2K and 4K.</p>

          <p>Not every frame defined by the ID3v2 standards is
          implemented; however, the commonly used subset of the frames
          is available. In particular, all text information frames
          (T***) including <q>User defined text frame</q> (TXXX), URL
          link frames (W***) including <q>User defined URL link
          frame</q> (WXXX), comments (COMM), relative volume
          adjustment 2 (RVA2), and attached picture (APIC) frames are
          supported.</p>

          <p>Some ID3v2.3 frames that have been discontinued in
          ID3v2.4 are supported by reading and converting them to
          other (functionally equivalent) frames: TDAT, TIME, TRDA and
          TYER are treated as TDRC and TORY is treated as TDOR.</p>

          <p>Note that the RVAD frame in ID3v2.3 is not supported.</p>

        </subsubsection>

        <subsubsection title="APE">

          <p>APEv1 and <a
          href="http://wiki.hydrogenaudio.org/index.php?title=APEv2_specification">APEv2</a>
          tags are supported with the restriction that the tag MUST be
          located at the end of the file, possibly before an ID3v1
          tag. <a
          href="http://wiki.hydrogenaudio.org/index.php?title=APE_key">Standard
          items</a> are supported as well as ReplayGain-related
          frames, and picture frames which are by convention binary
          items identified by a key starting with <q>Cover Art</q>
          followed by the picture type definition in brackets. This is
          compatible with most existing tagging software.</p>

        </subsubsection>

        <subsubsection title="Ogg Xiph comments">

          <p>Ogg Xiph comments (also known as Ogg Vorbis comments) are
          supported according to the recommended field names in the <a
          href="http://xiph.org/vorbis/doc/v-comment.html">Vorbis
          format spec</a>. In addition to this, COMMENT, DISC, and
          ReplayGain-related fields are also supported.
          </p>

        </subsubsection>

        <subsubsection title="FLAC pictures">

          <p>In FLAC files there may be an Ogg Xiph comment block
          along with separate picture blocks that contain one embedded
          picture each. This tag is Aqualung's pseudo-tag for
          referring to the set of picture blocks in a FLAC file, so
          the only frame you can add to this tag is the
          <q>Attached picture</q>.</p>

        </subsubsection>

        <subsubsection title="Musepack ReplayGain data">

          <p>In <a
          href="http://trac.musepack.net/trac/wiki/SV7Specification">Musepack
          SV7</a> streams there may be ReplayGain data in the file
          (not in a metadata tag, but in the coded audio data
          itself). Technically, it is always present, but is only
          treated as existent when it is nonzero. Aqualung displays
          (and has the capability to use) this information by
          referring to it as a <q>Musepack ReplayGain</q> pseudo-tag
          (which, again, is not a proper metadata tag in
          reality). This information is read-only.
          </p>

        </subsubsection>

        <subsubsection title="Generic StreamMetadata">

          <p>This is a read-only pseudo-tag carrying information that
          was obtained when speaking to the Icecast or SHOUTcast
          stream server. Specifically, the relevant HTTP header fields
          received from the server are saved in this pseudo-tag and
          made available for viewing. These currently include the
          <q>Icy-Name</q>, <q>Icy-Description</q> and <q>Icy-Genre</q>
          fields.</p>

        </subsubsection>

        <subsubsection title="MPEG StreamMetadata">

          <p>This is a read-only pseudo-tag carrying information that
          was received while listening to an MPEG stream on internet
          radio via <a
          href="http://www.smackfu.com/stuff/programming/shoutcast.html">SHOUTcast</a>.
          This information consists of <q>key:value</q> pairs, and is
          thus fairly similar to Ogg Xiph comments. Usually internet
          broadcast stations include only a small number of fields,
          but since the field name is included in the transmission,
          there is no restriction on the supported fields.</p>

        </subsubsection>

        <subsubsection title="MOD information">

          <p>For files handled by the MOD library, some read-only
          information about the file (number of channels, instruments,
          etc.) is displayed.</p>

        </subsubsection>

      </subsection>

    </section>

    <section title="Settings" img="settings.png">

      <p>This dialog is the control center of the program, and is a
      central place to set user-accessible options affecting the
      behavior of the program. It is accessible from the main window's
      popup menu, and is split into multiple notebook pages to make
      arranging and accessing all the options easier. The following
      subsections describe the individual notebook pages of the
      dialog.</p>

      <subsection title="General" key="settings-general">

        <p>The <gui>General</gui> tab itself is further divided into
        tabs, which are explained below.</p>

        <subsubsection title="Main Window">

          <p>The options controlling the behavior of the Main Window
          speak for themselves. One advantage of combining the Play
          and Pause buttons is that it allows for starting playback
          and later toggling between play and pause with the same
          remote command, <q><cmd>aqualung -N0 --play</cmd></q>. It is
          useful if your keyboard has a combined Play/Pause multimedia
          button and you want to utilize its functionality to control
          Aqualung via remote commands.</p>

        </subsubsection>

        <subsubsection title="Title Format">

          <p>The <gui>Title format</gui> string will be used to
          construct a single title line from an Artist, a Record and a
          Track name when adding songs to the Playlist. The Artist,
          Record and Track names should appear as <q>%a</q>, <q>%r</q>
          and <q>%t</q> flags in the template, respectively.</p>

          <p>Conditional string elements can be inserted using a
          <q><cmd>?A1|A2|...|An{CONTENT}</cmd></q> expression, where
          each <cmd>Ai</cmd> should be a subset of the available flag
          characters (that is, the set {a,r,t}). The value of the
          conditional expression is the logical OR of the individual
          <cmd>Ai</cmd> expressions. The value of an <cmd>Ai</cmd>
          expression is true if all strings are available whose flag
          character appears in the expression in question (logical
          AND).</p>

          <p>If the conditional is true, the content of the following
          pair of braces will be inserted, otherwise it will be
          skipped. The <cmd>CONTENT</cmd> string may contain the flags
          <q>%a</q>, <q>%r</q> or <q>%t</q> as well.</p>

          <p>If you want to insert a literal <q>%</q>, <q>?</q> or
          <q>}</q> you should write <q>%%</q>, <q>%?</q> or <q>%}</q>,
          respectively, except for a <q>?</q> inside <cmd>CONTENT</cmd>,
          and a <q>}</q> outside <cmd>CONTENT</cmd>, where they can
          appear unquoted. Of course it is good practice to always
          escape these characters for the sake of clarity if one needs
          them literally.</p>

          <p>Everything that is neither a conditional expression nor a
          flag will be copied verbatim into the result.</p>

          <p>Note that the expression <q>?a{%a}</q> is equivalent to
          <q>%a</q> since the flags will only be substituted if the
          corresponding string is available, so there's no need for the
          extra check.</p>

          <p>An example title format is <q>%a?ar|at{ - }%r?rt{ -
          }%t</q>. Using this format string, one would get the following
          components, in order:</p>

          <tabular>
            <tr>
              <td>%a</td>
              <td>artist name if available</td>
            </tr>
            <tr>
              <td>?ar|at{ - }</td>
              <td>if (artist AND record) OR (artist AND track) available, the string <q> - </q></td>
            </tr>
            <tr>
              <td>%r</td>
              <td>record name if available</td>
            </tr>
            <tr>
              <td>?rt{ - }</td>
              <td>if (record AND track) available, the string <q> - </q></td>
            </tr>
            <tr>
              <td>%t</td>
              <td>track name, if available</td>
            </tr>
          </tabular>

        </subsubsection>

        <subsubsection title="Lua extension file">

          <p>This section is only available if Aqualung is compiled
          with Lua extension support.  If so, it specifies the 
          file to use for the extension support  See the Extending
          Aqualung section for details about what's possible to
          include in this file.</p>

        </subsubsection>

        <subsubsection title="Systray">

          <p>This page is present only if Aqualung was compiled with
          systray support. Even if it is supported, it can be turned
          off here, which naturally makes further configuration
          useless. If systray is enabled, Aqualung can start in
          minimized state <ndash/> a useful feature if the program is
          launched automatically from the startup script of the window
          manager.</p>

          <p>Mouse button and wheel events on the tray icon are
          supported and can be assigned configurable commands. You can
          assign separate commands to the vertical and horizontal
          mouse wheels. Choose the desired command from the list
          displayed by the corresponding combo box.</p>

          <p>The left and right mouse buttons are reserved for
          hiding/showing the windows and popping up the context menu,
          respectively. Any other buttons can be bound to a custom
          command by adding a new button to the list. In the presented
          dialog, move the cursor over the test panel and press the
          button you want to configure. Below the test panel, choose
          the appropriate action to be taken when you click on the
          tray icon with the selected mouse button. One button can be
          assigned only one command at a time. To change an already
          configured button, remove it from the list first and add it
          again.</p>

        </subsubsection>

        <subsubsection title="Miscellaneous">

          <p>The so-called <gui>Implicit command line</gui> is something
          you should pay attention to. It exists mainly for those who
          have a stable sound setup and always use the program with the
          same output device, e.g. they have only OSS and don't plan to
          upgrade. For such users it may be cumbersome to always specify
          the desired output device on the command line, along with its
          optional parameters if needed. So here you may enter something
          that you would otherwise enter on the command line every
          time.</p>

          <p>But beware: you cannot override or turn off every option,
          so for example if you enter <q>--help</q> here, the program
          will always display the standard message and exit immediately;
          and there is no way to override that from the command line. If
          you get into trouble, all you have to (or can) do is grab a
          text editor and hack it out of
          <file>$XDG_CONFIG_HOME/aqualung/config.xml</file> where it is
	  stored (note that $XDG_CONFIG_HOME is most likely ~/.config).
          You will find it between <q>&lt;default_param&gt;</q> and
          <q>&lt;/default_param&gt;</q>.</p>

          <p>There are also some options to handle the display of album
          cover art. This feature is automatically triggered when an
          image file is found in the same directory as the track being
          played. The filenames that will at first be looked for are
          <q>cover.ext</q>, <q>.cover.ext</q>, <q>front.ext</q>,
          <q>.front.ext</q>, <q>folder.ext</q>, <q>.folder.ext</q>,
          where <q>ext</q> is one of <q>jpg</q>, <q>jpeg</q>,
          <q>png</q>, <q>gif</q>, <q>bmp</q>, <q>tif</q>,
          <q>tiff</q>. If none of them exists, the first image file
          having an appropriate extension will be used. If you select a
          record (or one of its tracks) in the Music Store, the image
          will be displayed in the comment pane. It is also shown in the
          File Info dialog as well as the main window during the
          playback of a track from this album. Clicking the image will
          show a zoomed version of the cover.</p>

          <p>When playing files or viewing them in the <gui>File
          info</gui> dialog, embedded pictures are also used for cover
          display. If an embedded picture frame is found in file
          metadata, it is displayed instead of any separate image
          file. If there is more than one embedded picture in the file,
          the first one is used. In these cases no separate image file
          is used, so the embedded image found in file metadata is
          displayed regardless of any separate image in the audio file's
          directory.</p>

          <p>There are some global options to set here as well, which
          should be quite obvious to use.</p>

        </subsubsection>

      </subsection>

      <subsection title="Playlist">

        <p>The Playlist is embedded in the Main window by default to
        achieve a more compact look. Turn it off to put the Playlist
        into a separate window.</p>

        <p>You can set whether to use Album mode by default when
        adding songs from Music Store to the Playlist. Regardless of
        this setting, you can always add tracks without using Album
        mode by using the <gui>Add to playlist</gui> popup menu in
        Music Store.</p>

        <p>Settings concerning playlist tabs can be made too. You can
        control whether to have close buttons on playlist tabs. If
        you don't want the tab bar to be hidden when only one tab is
        open, uncheck the <gui>Always show the tab bar</gui> item.</p>

        <p>The option to save/restore the Playlist when exiting and
        starting the program is turned on by default. If you prefer
        starting with an empty Playlist every time, turn it off. You
        can also set whether to save the Playlist periodically. The
        interval for this is adjustable between 1 and 60 minutes.</p>

        <p>Here you can also set the visibility of the track lengths
        and RVA values in the Playlist. By drag &amp; dropping entries
        in the list, you can rearrange the columns. The position of
        those that are not shown is of course irrelevant. Other
        options should be obvious, such as hiding the statusbar, or
        showing active track name in bold.</p>

      </subsection>

      <subsection title="Music Store">

        <p>The purpose and usage of Music Store and database files
        have been <ref refkey="store">covered</ref>. On this page you
        can somewhat customize the Music Store, decide whether to hide
        the comment pane or the status bar, or to enable rules
        hint. If you choose to expand stores on startup, all toplevel
        tree nodes will automatically be expanded after starting
        Aqualung.</p>

        <p>As already mentioned before, this page is also the place to
        manage music store database files too. Pressing the
        <gui>Refresh</gui> button will update the accessibility (r,
        rw, unreachable) flags of the specified store files.</p>

      </subsection>

      <subsection title="DSP">

        <p>Changing the two options on the <gui>DSP</gui> page takes
        effect immediately, and stays that way regardless of whether
        you leave the dialog with the <gui>OK</gui> or
        <gui>Cancel</gui> button.</p>

        <p>The sample rate converter type should be chosen to fit the
        resources of your computer, and provide the best affordable
        quality at the same time. So fire up top or something similar
        on a spare terminal, and start with the best converter. If
        your machine is not very new, this will consume huge amounts
        of CPU, and the playback will very likely be choppy. If this
        is the case, you will have to pick another
        converter. <gui>Fastest Sinc Interpolator</gui> is usable on
        today's most machines. If not, use <gui>Linear
        Interpolator</gui> instead of <gui>ZOH</gui> since both are
        blindingly fast, but linear is naturally much better than
        zero-order (constant hold). It should also be noted that the
        CPU usage of sample rate conversion is greatly affected by the
        difference between the two sample rates: upsampling 32k to 96k
        will be much more expensive than, say, upsampling from 44.1k
        to 48k.</p>

        <p>Of course, sample rate conversion springs into action only
        when the output sample rate (the sample rate you specified in
        case of OSS or ALSA, or the sample rate the JACK server
        specified in case of JACK) does not match the sample rate of
        the track you are playing. A typical situation is when you
        have 44.1k files grabbed from CD and play back at 48k.</p>

      </subsection>

      <subsection title="Playback RVA">

        <p>This page is for setting the RVA options. RVA itself has
        already been discussed <ref refkey="rva">above</ref>.</p>

      </subsection>

      <subsection title="Metadata">

        <p>On this page you can configure how the Aqualung metadata
        subsystem works. See <ref refkey="metadata-config">this
        section</ref> for a detailed description.</p>

      </subsection>

      <subsection title="CD Audio">

        <p>You can set the drive speed for CD playing in CD-ROM speed
        units. Lower speed usually means less drive noise. However,
        when using Paranoia error correction modes for increased
        accuracy, generally much larger speeds are required to prevent
        buffer underruns (and thus audible drop-outs), but this is
        very device-specific.</p>

        <p>Most drives let Aqualung know when a CD has been inserted
        or removed. However, some drives don't report correctly, and
        thus it may happen that a newly inserted CD remains unnoticed
        to Aqualung. In such cases, forcing TOC re-read on every drive
        scan should help.</p>

        <p>Aqualung can automatically add newly inserted CDs to the
        Playlist, and remove them when the CD is removed from the
        drive. A CD will only be added if the Playlist doesn't already
        contain any of its tracks. The newly added CD will appear at
        the top of the Playlist, but after all CD tracks or albums
        being in the list.</p>

        <p>Removal from Playlist will happen if the CD is removed from
        the drive, or the user quits Aqualung while the CD is in the
        drive. All tracks of the CD will be removed, even if they were
        mixed with other audio files or some of them were removed
        manually.</p>

      </subsection>

      <subsection title="CDDB">

        <p>You can set some parameters of the CDDB lookups here. As
        for the query protocol, standard CDDBP (port 888) and CDDB
        over HTTP (port 80) are supported. The standard CDDBP port is
        the recommended choice unless some unavoidable firewall
        settings prevent you from using it. For submission HTTP is
        always used.</p>

        <p>The default CDDB database server address is freedb.org, but
        you may specify another server (maybe a close mirror). The
        connection timeout can also be set here.</p>

        <p>If you want to submit records to the CDDB server, you will
        have to give a valid email address. Should your submission be
        rejected for some reason, you will receive a note about the
        failure to this address.</p>

        <p>Retrieved matches are cached in the
        <file>~/.cddbslave</file> directory by default. If you prefer
        an other location instead, specify a local CDDB directory. If
        you do not intend to download from a CDDB server at all, you
        can set to use the local database only.</p>

      </subsection>

      <subsection title="Internet">

        <p>Instead of connecting directly to the Internet you can use
        an HTTP proxy. In this case you have to specify the proxy
        server address and port. You may also provide a list of
        domains that should be accessed without using the
        proxy. Setting a proxy affects Internet radio streaming,
        podcast downloading and CDDB lookups.</p>

        <p>Timeout for socket I/O is used to prevent Aqualung from
        hanging if data is coming too slowly or not at all from a
        radio station.</p>

      </subsection>

      <subsection title="Appearance">

        <p>On this page you can decide whether to override some fonts
        and colors provided by the skins. You can change the font of
        the Music Store, Playlist, the track and timer labels, and set
        the color of the active track in Playlist. Useful if you have
        problems with font size or your system lacks or improperly
        renders a font specified in a skin.</p>

        <p>You can entirely get rid of all skin settings by selecting
        <gui>Disable skin support</gui>. It allows you to flawlessly
        use a GTK or other theme with Aqualung.</p>

      </subsection>

    </section>

    <section title="Keyboard shortcuts">

      <subsection title="Main window">

        <shortcut>
          <tr>
            <td>z, Z, y, Y, comma</td>
            <td>jump to previous track</td>
          </tr>
          <tr>
            <td>x, X, p, P</td>
            <td>play</td>
          </tr>
          <tr>
            <td>c, C, SPACE</td>
            <td>pause</td>
          </tr>
          <tr>
            <td>v, V, s, S</td>
            <td>stop</td>
          </tr>
          <tr>
            <td>CTRL+S</td>
            <td>stop after current song (toggle)</td>
          </tr>
          <tr>
            <td>b, B, period</td>
            <td>jump to next track</td>
          </tr>
          <hline/>
          <tr>
            <td>left arrow</td>
            <td>jump (seek) backwards in current track</td>
          </tr>
          <tr>
            <td>right arrow</td>
            <td>jump (seek) forward in current track</td>
          </tr>
          <tr>
            <td>BACKSPACE</td>
            <td>restart current track</td>
          </tr>
          <hline/>
          <tr>
            <td>/</td>
            <td>volume down</td>
          </tr>
          <tr>
            <td>*</td>
            <td>volume up</td>
          </tr>
          <tr>
            <td>ALT+/</td>
            <td>balance towards left</td>
          </tr>
          <tr>
            <td>ALT+*</td>
            <td>balance towards right</td>
          </tr>
          <hline/>
          <tr>
            <td>ALT+S</td>
            <td>show/hide Music Store</td>
          </tr>
          <tr>
            <td>ALT+L</td>
            <td>show/hide Playlist</td>
          </tr>
          <tr>
            <td>ALT+X</td>
            <td>show/hide LADSPA patch builder</td>
          </tr>
          <tr>
            <td>1</td>
            <td>toggle track repeat</td>
          </tr>
          <tr>
            <td>2</td>
            <td>toggle repeat all</td>
          </tr>
          <tr>
            <td>3</td>
            <td>toggle shuffle</td>
          </tr>
          <hline/>
          <tr>
            <td>&lt;</td>
            <td>adjust start of loop range to current playing position</td>
          </tr>
          <tr>
            <td>&gt;</td>
            <td>adjust end of loop range to current playing position</td>
          </tr>
          <hline/>
          <tr>
            <td>i, I</td>
            <td>bring up the File Info dialog for currently played track</td>
          </tr>
          <tr>
            <td>o, O</td>
            <td>show Settings</td>
          </tr>
          <tr>
            <td>k, K</td>
            <td>show Skin Chooser</td>
          </tr>
          <hline/>
          <tr>
            <td>ESC</td>
            <td>hide all windows (works only with systray support)</td>
          </tr>
          <tr>
            <td>CTRL+Q</td>
            <td>quit Aqualung</td>
          </tr>
        </shortcut>

      </subsection>

      <subsection title="Playlist">

        <shortcut>
          <tr>
            <td>up/down arrow</td>
            <td>navigation in the list</td>
          </tr>
          <tr>
            <td>ENTER, double click</td>
            <td>start playback of the selected or double-clicked track, or jump to it if already playing</td>
          </tr>
          <tr>
            <td>a, A</td>
            <td>scroll list to show active track</td>
          </tr>
          <tr>
            <td>w, W</td>
            <td>collapse all nodes</td>
          </tr>
          <tr>
            <td>+/-, ` (grave)</td>
            <td>expand/collapse selected node</td>
          </tr>
          <hline/>
          <tr>
            <td>insert</td>
            <td>add files</td>
          </tr>
          <tr>
            <td>SHIFT+insert</td>
            <td>add directory</td>
          </tr>
          <hline/>
          <tr>
            <td>CTRL+A</td>
            <td>select all</td>
          </tr>
          <tr>
            <td>CTRL+SHIFT+A</td>
            <td>select none</td>
          </tr>
          <hline/>
          <tr>
            <td>DELETE</td>
            <td>remove selected tracks</td>
          </tr>
          <tr>
            <td>SHIFT+DELETE</td>
            <td>remove all tracks</td>
          </tr>
          <tr>
            <td>CTRL+DELETE</td>
            <td>remove selected tracks from filesystem (confirmation required)</td>
          </tr>
          <tr>
            <td>u, U</td>
            <td>cut selected (remove <emph>not</emph> selected tracks)</td>
          </tr>
          <hline/>
          <tr>
            <td>t, T</td>
            <td>send selected songs to iRiver iFP device</td>
          </tr>
          <tr>
            <td>i, I, F1</td>
            <td>bring up the File info dialog (also accessible from the right-click popup menu)</td>
          </tr>
          <tr>
            <td>f, F</td>
            <td>search in Playlist</td>
          </tr>
          <hline/>
          <tr>
            <td>CTRL+T</td>
            <td>new tab</td>
          </tr>
          <tr>
            <td>CTRL+R</td>
            <td>rename tab</td>
          </tr>
          <tr>
            <td>CTRL+W</td>
            <td>close tab</td>
          </tr>
          <tr>
            <td>CTRL+SHIFT+T</td>
            <td>undo close tab</td>
          </tr>
          <tr>
            <td>CTRL+PageDown, CTRL+TAB</td>
            <td>switch to next tab</td>
          </tr>
          <tr>
            <td>CTRL+PageUp, CTRL+SHIFT+TAB</td>
            <td>switch to previous tab</td>
          </tr>
          <hline/>
          <tr>
            <td>CTRL+X</td>
            <td>cut selection to clipboard</td>
          </tr>
          <tr>
            <td>CTRL+C</td>
            <td>copy selection to clipboard</td>
          </tr>
          <tr>
            <td>CTRL+V</td>
            <td>paste clipboard before cursor</td>
          </tr>
          <tr>
            <td>CTRL+SHIFT+V</td>
            <td>paste clipboard after cursor</td>
          </tr>
          <hline/>
          <tr>
            <td>q, Q, ESC</td>
            <td>hide window (same as ALT+L in main window)</td>
          </tr>
        </shortcut>

      </subsection>

      <subsection title="Music Store">

        <shortcut>
          <tr>
            <td>up/down arrow</td>
            <td>navigation in the tree</td>
          </tr>
          <tr>
            <td>+/-, ENTER</td>
            <td>expand/collapse current node</td>
          </tr>
          <tr>
            <td>w, W</td>
            <td>collapse all rows</td>
          </tr>
          <hline/>
          <tr>
            <td>double click, a, A</td>
            <td>add item to Playlist (recursive)</td>
          </tr>
          <tr>
            <td>n, N</td>
            <td>new item</td>
          </tr>
          <tr>
            <td>CTRL+N</td>
            <td>new child item</td>
          </tr>
          <tr>
            <td>e, E</td>
            <td>edit item</td>
          </tr>
          <tr>
            <td>x, X</td>
            <td>export item</td>
          </tr>
          <tr>
            <td>DELETE</td>
            <td>remove item</td>
          </tr>
          <hline/>
          <tr>
            <td>u, U</td>
            <td>Build / Update store from filesystem (for stores), Update (for podcasts)</td>
          </tr>
          <tr>
            <td>v, V</td>
            <td>start volume calculation for unmeasured items (recursive)</td>
          </tr>
          <tr>
            <td>f, F</td>
            <td>search in all stores</td>
          </tr>
          <hline/>
          <tr>
            <td>s, S</td>
            <td>save store (for stores only)</td>
          </tr>
          <tr>
            <td>b, B</td>
            <td>build / update store from filesystem (for stores only)</td>
          </tr>
          <tr>
            <td>i, I</td>
            <td>bring up the File info dialog (for tracks only)</td>
          </tr>
          <hline/>
          <tr>
            <td>q, Q, ESC</td>
            <td>hide window (same as ALT+S in main window)</td>
          </tr>
        </shortcut>

        <p>In addition to the popup menu items and keyboard shortcuts,
        you can also add an item to the Playlist by drag &amp;
        dropping from the Music Store window into the Playlist. This
        method has a further advantage: you can place the newly added
        items in any position, not just append to the end of the
        list.</p>

        <p>Another trick is that middle clicking on an item in the
        Music Store adds the content to a new playlist tab, which will
        be named after the middle-clicked element by default.</p>

      </subsection>

    </section>

    <section title="Extending Aqualung">

      <subsection title="Introduction">

        <p>Aqualung is written in the C programming language, but if
        compiled with Lua support, embeds a Lua interpreter that can
        used by the user to change Aqualung's behavior or add custom
        functions without recompiling the program. Aqualung supports
        the following 5 types of extensions:</p>

        <ul>
          <li>Title Format</li>
          <li>Hooks</li>
          <li>Playlist Menu Commands</li>
          <li>Remote Commands</li>
          <li>Keybindings</li>
        </ul>

        <p>The <gui>Lua extension file</gui> setting appears if
        Aqualung is compiled with Lua support. It allows you to
        choose a <q>.lua</q> file containing Lua code that implements
        any of the above extensions.  You can type in the path to the file or click
        <gui>Browse</gui> to get a file chooser. The <q>.lua</q>
        file should be a valid Lua source code file.</p>

        <p>If you change the <gui>Lua extension file</gui> setting in
        the options page, and accept the changes, Aqualung will close
        the existing Lua interpreter and create a new Lua intepreter.
        To close the existing Lua interpreter and immediately reopen
        it with the same extension file, use the <gui>Reload Lua interpreter</gui>
        setting.  Note that whenever the Lua interpreter is closed,
        all Lua-internal state is lost.</p>

      </subsection>

      <subsection title="Programmable Title Format" key="prog_title_format">
        <p>By specifying a function named <q><cmd>playlist_title</cmd></q>
        in your Lua extension file, which should accept no arguments and
        should return a string, you can override the default title formatting
        specified by the <gui>Title format</gui> setting. Similarly,
        by specifying a function named <q><cmd>application_title</cmd></q> with
        the same API, you have the application window's title set separately
        from the playlist title.  If you would like
        the application title and playlist title to be the same, you
        can have your <q><cmd>application_title</cmd></q> function
        just call <q><cmd>playlist_title</cmd></q>.</p>

        <p>Aqualung defines two functions for you to use to get data
        to use in the title format, <q><cmd>m</cmd></q> and
        <q><cmd>i</cmd></q>. <q><cmd>m</cmd></q> stands for metadata,
        and <q><cmd>i</cmd></q> stands for file info. The
        <q><cmd>m</cmd></q> function is used to get metadata from file
        tags, while the <q><cmd>i</cmd></q> function is used to get
        information about the file itself, such as the length,
        bitrate, and number of channels. If there are multiple
        metadata entries (such as multiple artists),
        <q><cmd>m</cmd></q> will return them as a single string
        separated with comma (<q><cmd>,</cmd></q>). If there is no
        metadata entry, <q><cmd>m</cmd></q> will return the empty
        string. If you ask for a metadata or file info entry that
        Aqualung doesn't understand, Aqualung will log an error and
        will fallback to using the standard title formatting code.</p>

        <p>Here are some examples.</p>

        <paragraph title="1. Very simple, showing basic syntax">

          <verbatim>
            @function playlist_title()
            @  return m('artist') .. '-' .. m('title') .. ' (' .. m('album') .. ')'
            @end</verbatim>

          <p>Results:</p>

          <ul>
            <li>Yngiew Malmsteen-Far Beyond the Sun (Rising Force)</li>
            <li>-Greensleeves ()</li>
          </ul>

        </paragraph>

        <paragraph title="2. Simple, showing use of conditional formatting">

          <verbatim>
            @function mi(field, format)
            @  if field ~= "" then
            @    field = string.format(format, field)
            @  end
            @  return field
            @end

            @function dirname(path)
            @  if string.find(path, "/") then
            @    return string.sub(path, 1, string.len(path) - string.find(string.reverse(path), "/"))
            @  else
            @    return ""
            @  end
            @end

            @function album()
            @  local a = m('album')
            @  if a ~= "" then
            @    a = a .. mi('date', ' (%s)')
            @  else
            @    a = dirname(i('filename'))
            @  end
            @  return a .. '-'
            @end

            @function playlist_title()
            @  return album() .. mi('trackno', '%s-') .. m('title')
            @end</verbatim>

          <p>Results:</p>

          <ul>
            <li>Rising Force (1984)-01-Far Beyond the Sun</li>
            <li>irish_music-Greensleeves</li>
          </ul>

        </paragraph>

        <paragraph title="3. Complex, showing quasi-columnar output via padding (requires a fixed width font for a decent appearance)">

          <verbatim>
            @-- Maximum length of a line in the playlist
            @maxlen = 85

            @-- Directory name for path
            @function dirname(path)
            @  if string.find(path, "/") then
            @    return string.sub(path, 1, string.len(path) - string.find(string.reverse(path), "/"))
            @  else
            @    return ""
            @  end
            @end

            @-- File name for path
            @function basename(path)
            @  if string.find(path, "/") then
            @    return string.sub(path, string.len(path) - string.find(string.reverse(path), "/") + 2)
            @  else
            @    return path
            @  end
            @end

            @-- The album name from the metadata, or the directory name of the file if not present
            @function album_or_dir()
            @  local album = m('album')
            @  if album == "" then
            @    album = basename(dirname(i("filename")))
            @  end
            @  return album
            @end

            @-- The title from the metadata, or the base name of the file if not present
            @function title_or_file()
            @  local title = m('title')
            @  if title == "" then
            @    local file = basename(i("filename"))
            @    if not  string.match(file, "^%d+%-%....$") then
            @      title = file
            @    end
            @  end
            @  return title
            @end

            @-- If the field exists in the metadata, format it using the format_string
            @function formatif(field, format_string)
            @  if field ~= "" then
            @    field = string.format(format_string, field)
            @  end
            @  return field
            @end

            @-- A string indicating the frequency in Hz, or the empty string if the frequency is 44100
            @function freq()
            @  local hz = string.format("%i", i('sample_rate'))
            @  if hz == "44100" then
            @    hz = ""
            @  else
            @    hz = formatif(hz, "[%sHz] ")
            @  end
            @  return hz
            @end

            @-- A string indicating the number of channels, unless the number of channels is 2 (stereo)
            @function chan()
            @  local m = string.format("%i", i('channels'))
            @  if m == "2" then
            @    m = ""
            @  elseif m == "1" then
            @    m = "[MONO] "
            @  else
            @    m = formatif(m, "[%s channels] ")
            @  end
            @  return m
            @end

            @-- Pad the string to the given length, adding spaces if it is too short and truncating
            @-- it if it is too long
            @function pad(s, n)
            @  local l = string.len(s)
            @  if l > n then
            @    s = string.sub(s, 1, n)
            @  else
            @    s = s .. string.rep(' ', n-l)
            @  end
            @return s
            @end

            @-- Combine the left and right sides, with the right side having priority
            @function finalize(l, r)
            @  return pad(l, maxlen - string.len(r)) .. r
            @end

            @-- Build the title in two parts, a left part (channel and frequency expections, album,
            @-- track number, title) and a right part (artist, genre, comment, date, and gain).
            @-- The right part is columnar, the left side is not.
            @function playlist_title()
            @  local l = chan() .. freq() .. formatif(album_or_dir(), "%s-")
            @            .. formatif(m('trackno'), "%s-") .. title_or_file()
            @  local r = "  " .. m('artist') .. "  " .. formatif(m("genre"), "%s  ")
            @            .. pad(m('comment'), 12) .. "  " .. pad(m("date"), 4) .. "  "
            @            .. pad(m('track_gain'), 5) .. " " .. pad(m('album_gain'), 5)
            @  return finalize(l, r)
            @end</verbatim>

          <p>Results:</p>

          <ul>
            <li>Rising Force-02-Far Beyond the Sun  Yngwie Malmsteen  Metal         1984  -0.89 -0.94</li>
            <li>irish_music-Greensleeves                             Celtic         1990  +0.83      </li>
          </ul>

        </paragraph>

        <paragraph title="Complete list of values that the `m' function accepts">

          <verbatim>
            @[ title | artist | album | date | genre | trackno |
            @  comment | disc | performer | description | organization
            @  | location | contact | license | copyright | isrc |
            @  version | subtitle | debut_album | publisher | conductor
            @  | composer | publication_right | file | ean_upc | isbn |
            @  catalog | label_code | record_date | record_location |
            @  media | index | related | abstract | language |
            @  bibliography | introplay | bpm | encoding_time |
            @  playlist_delay | original_release_time | release_time |
            @  tagging_time | encoded_by | lyricist | filetype |
            @  involved_people | content_group | initial_key | length |
            @  musician_credits | mood | original_album |
            @  original_filename | original_lyricist | original_artist
            @  | file_owner | band | remixed | set_part | produced |
            @  station_name | station_owner | album_order |
            @  performer_order | title_order | software | set_subtitle
            @  | user_text | commercial_info | legal_info |
            @  file_website | artist_website | source_website |
            @  station_website | payment | publisher_website | user_url
            @  | vendor | rg_loudness | track_gain | track_peak |
            @  album_gain | album_peak | icy_name | icy_descr |
            @  icy_genre | rva ]</verbatim>

        </paragraph>

        <paragraph title="Here is a complete list of values that the `i' function accepts">

          <verbatim>
            @[ filename | sample_rate | channels | bps | samples |
            @  voladj_db | voladj_lin | stream | mono ]</verbatim>

        </paragraph>

        <p>Changing the <gui>Lua extension file</gui> entry
        takes effect immediately, but does not affect existing titles
        in the playlist. In order to update existing titles in the
        playlist, the <gui>Reread file metadata</gui> setting should
        be used.</p>

      </subsection>

      <subsection title="Hooking into Aqualung Events">

        <p>Aqualung allows you to add hooks to certain events to
        have extension code executed when those events occur.
        Hooks are added by calling the <q><cmd>add_hook</cmd></q>
        function with a string and a function.  The string is the
        type of hook you are adding, and the function is the
        function to call when the related event occurs.
        You can have multiple hook functions added to the same
        hook type, and they will be executed in order of addition.</p>

        <paragraph title="Hook 1: track_change">

            <p>The track_change hooks are called whenever a new track
            starts playing.  They are not called until after the
            current file has been changed to the new file. Inside
            this hook, you can call the <q><cmd>m</cmd></q> and
            <q><cmd>i</cmd></q> playlist formatting functions to
            access the metadata of the newly loaded file.</p>

            <verbatim>
            @add_hook("track_change", function ()
            @    print("File: " .. current_file() .. " Artist: " .. m("artist"))
            @end)</verbatim>

            <p>Prints the filename and artist of the new file.</p>

        </paragraph>

        <paragraph title="Hook 2: track_position_change">

            <p>The track_position_change hooks are called whenever the
            scale/position of the current track changes.  Generally,
            it is called a few times a second.  This can be used to
            keep track of aqualung's current position in the file,
            and is passed a floating point argument of the percent
            complete.  Note that tracks that do not have a set
            number of samples (such as internet radio streams) will
            not have this hook called when they are playing.</p>

            <verbatim>
            @add_hook("track_position_change", function ()
            @    print(current_file() .. " " .. string.format("%0.2f%%", current_file_percent_complete()))
            @end)</verbatim>

            <p>Prints the filename and percent complete of the currently
            playing file.</p>

        </paragraph>

      </subsection>

      <subsection title="Custom Playlist Menu Commands">

        <p>You can add custom playlist menu commands to Aqualung by
        calling the <q><cmd>add_playlist_menu_command</cmd></q>
        function with a string and a function.  The string is the
        label of the playlist menu entry, and the function is the
        function to call when the playlist menu entry is clicked.
        You can include <q>/</q>'s inside the string to create
        submenus (there is currently no support for a <q>/</q> to
        appear inside a label).  The function should accept 0
        arguments.</p>

        <paragraph title="Example 1: Exiting Aqualung immediately with an error code">

            <verbatim>
            @add_playlist_menu_command("Exit Immediately!!", function ()
            @    os.exit(1)
            @end)</verbatim>

            <p>Using this example is not recommended.</p>

        </paragraph>

        <paragraph title="Example 2: Printing selected files to standard output">

           <verbatim>
            @add_playlist_menu_command("Print Filenames", function ()
            @  for k, v in pairs(selected_files()) do
            @    print(v)
            @  end
            @end)</verbatim>

        </paragraph>

        <paragraph title="Example 3: Running commands on file names, under a Database submenu">

            <verbatim>
            @add_playlist_menu_command("Database/Add Favorite Tracks", function ()
            @  for k, v in pairs(selected_files()) do
            @    os.execute("add_favorite_track '" .. string.gsub(v, "'", "'\\''") .. "'")
            @  end
            @end)
            @add_playlist_menu_command("Database/Remove Favorite Tracks", function ()
            @  for k, v in pairs(selected_files()) do
            @    os.execute("remove_favorite_track '" .. string.gsub(v, "'", "'\\''") .. "'")
            @  end
            @end)</verbatim>

          <p>The string.gsub call is for escaping filenames, since Lua's os.execute sends the
          string argument to the shell.</p>

        </paragraph>

      </subsection>

      <subsection title="Custom Remote Commands">

        <p>You can add custom remote commands to Aqualung by
        calling the <q><cmd>add_remote_command</cmd></q>
        function with a string and a function.  The string is the
        name of the remote command, and the function is the
        function to call when the remote command is triggered.
        You can call a custom remote command using the -C argument to
        aqualung (e.g. <q><cmd>aqualung -C function_name</cmd></q>).
        The string argument/function name should be fewer than
        250 characters.  The function should accept zero arguments.</p>

        <paragraph title="Example 1: Exiting Aqualung immediately">

            <verbatim>
            @add_remote_command("exit", function ()
            @    os.exit()
            @end)</verbatim>

            <p>Call with <q><cmd>aqualung -C exit</cmd></q>.  Using this example is not recommended.</p>

        </paragraph>

      </subsection>

      <subsection title="Custom Keybindings">

        <p>You can add custom keybindings for Aqualungs main window by
        calling the <q><cmd>add_main_keybinding</cmd></q>
        function with a string and a function.  The string is the
        GDK name of the key, optionally preceded by modifiers, and the
        function is the function to call when the keybinding is used in
        the main window directly after a Ctrl-z or Ctrl-Z keybinding.
        The function should accept zero arguments.</p>

        <paragraph title="Here is a complete list of optional modifiers">

            <verbatim>
            @[ control- | alt- | super- | control-alt- | super-alt- |
            @  super-control- | super-control-alt- ]</verbatim>

          <p>The control- modifier is for the Ctrl key, the alt- is for
          the Alt/Mod1 keys and the super- is for the Super/Mod4/Windows keys.</p>
        </paragraph>

        <paragraph title="Example 1: Exiting Aqualung immediately">

            <verbatim>
            @add_main_keybinding("control-q", function ()
            @    os.exit()
            @end)</verbatim>

            <p>Using this example is not recommended, but if you want to,
            you would focus on Aqualung's main window, hit Ctrl-z then
            Ctrl-q.</p>

        </paragraph>

        <paragraph title="Example 2: Testing all modifier keys">

            <verbatim>
            @add_main_keybinding("b", function () print("b received") end)
            @add_main_keybinding("alt-b", function () print("alt-b received") end)
            @add_main_keybinding("control-b", function () print("control-b received") end)
            @add_main_keybinding("super-b", function () print("super-b received") end)
            @add_main_keybinding("control-alt-b", function () print("control-alt-b received") end)
            @add_main_keybinding("super-alt-b", function () print("super-alt-b received") end)
            @add_main_keybinding("super-control-b", function () print("super-control-b received") end)
            @add_main_keybinding("super-control-alt-b", function () print("super-control-alt-b received") end)
            @add_main_keybinding("B", function () print("B received") end)
            @add_main_keybinding("alt-B", function () print("alt-B received") end)
            @add_main_keybinding("control-B", function () print("control-B received") end)
            @add_main_keybinding("super-B", function () print("super-B received") end)
            @add_main_keybinding("control-alt-B", function () print("control-alt-B received") end)
            @add_main_keybinding("super-alt-B", function () print("super-alt-B received") end)
            @add_main_keybinding("super-control-B", function () print("super-control-B received") end)
            @add_main_keybinding("super-control-alt-B", function () print("super-control-alt-B received") end)
            </verbatim>

            <p>This shows all of the possible combinations of modifier keys for
            a custom keybinding that rely on the b key.</p>

        </paragraph>

      </subsection>

      <subsection title="Lua Extension API methods">

        <p>These are global methods that you can call inside
        the methods described above in order to get information
        from Aqualung, or change Aqualung's settings or behavior.</p>

        <ul>
          <li>current_file(): Returns the filename (string) of currently playing file, or nil if no file is playing.</li>
          <li>current_file_percent_complete(): Returns number between 0 and 100 with the percent complete of the current
              playing file, or nil if no file is playing.</li>
          <li>selected_files(): Returns an array (integer-keyed table) of selected filenames (strings) for the current playlist.</li>
        </ul>

      </subsection>

    </section>

  </document>

</aqualung-doc>